Over the past several weeks we've taken a look at a couple of products
from Intel's X79 Express platform, launched just seven weeks ago. The
past two products we've looked at from ASUS and ECS each had their own
spin on the features they provided, each having its own flavor that lets
each stand out. Gigabyte recently revamped their own line-ups, offering
several different products with different color schemes, and features
tailored towards specific audiences. Today we take a look at Gigabyte's
mid-range X79 offering, the GA-X79-UD5. Gigabyte has been in the news
recently with their X79 products, with a BIOS recall and a launch of a
new BIOS that at first glance aims to offer performance not seen
anywhere else. With many questions to be asked, we fired up the
GA-X79-UD5 to get some answers, and set the story straight.
Specifications


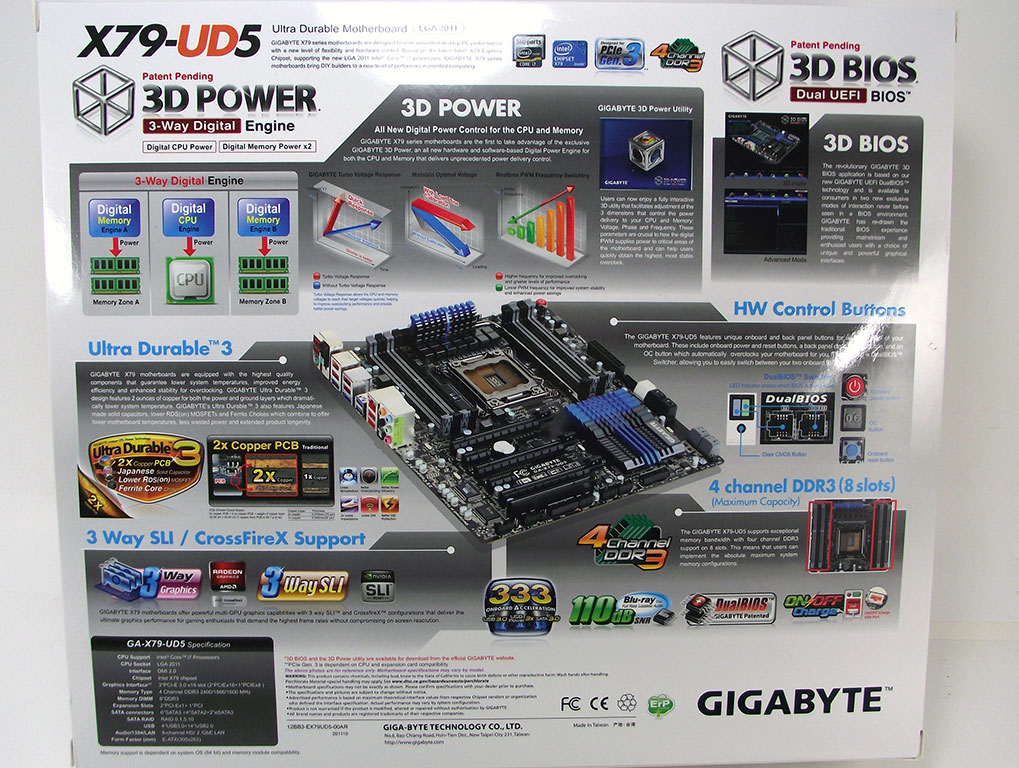
The Gigabyte GA-X79-UD5 comes in a bright white box, with the board's
name the first thing that catches the eye, thanks to part of the writing
being bright orange. There's just a few logos across the bottom for
technology the board carries, and very little else, just what we like to
see. Simple and elegant, the box design is sure to stand out on the
store shelf, thanks to its clean looks. The rear of the box features a
picture of the board itself in the middle, with several detailed
explanations of the board's features. There's nothing overly surprising
here, other than that the box itself is a bit taller than a standard ATX
board box, and weighs a fair bit, too.

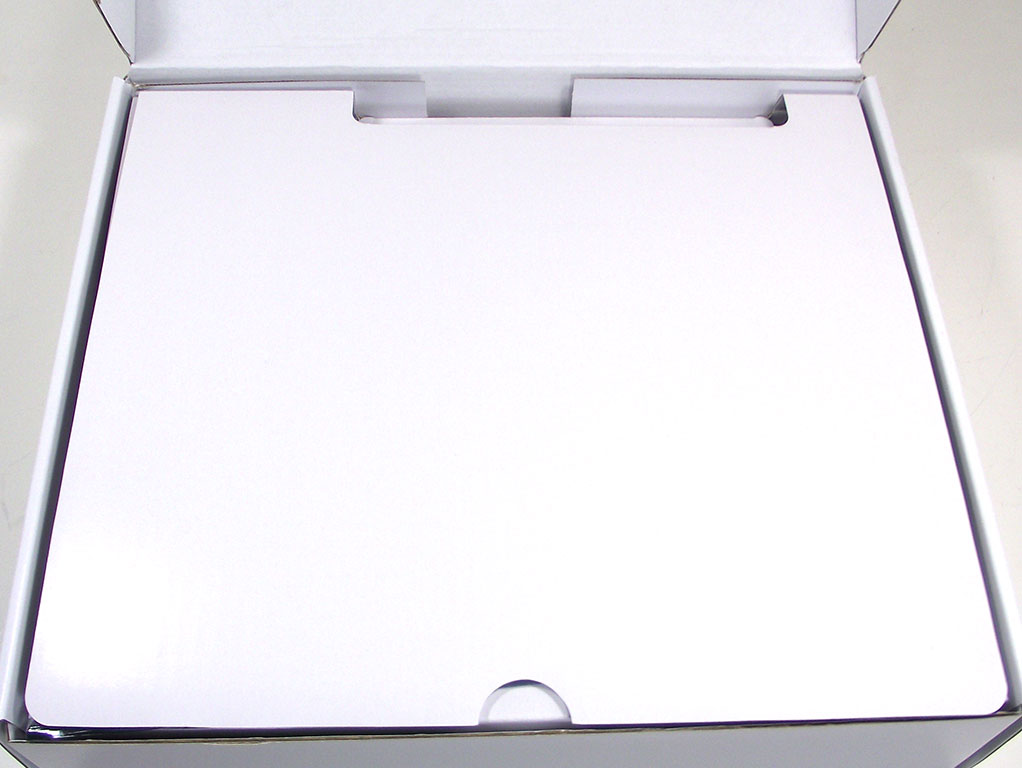
Inside we find another white box, this time made of bleached cardboard.
Opening the flap, we are greeted by yet more cardboard, and we are happy
to see such an expensive product nice and secure inside it's box.
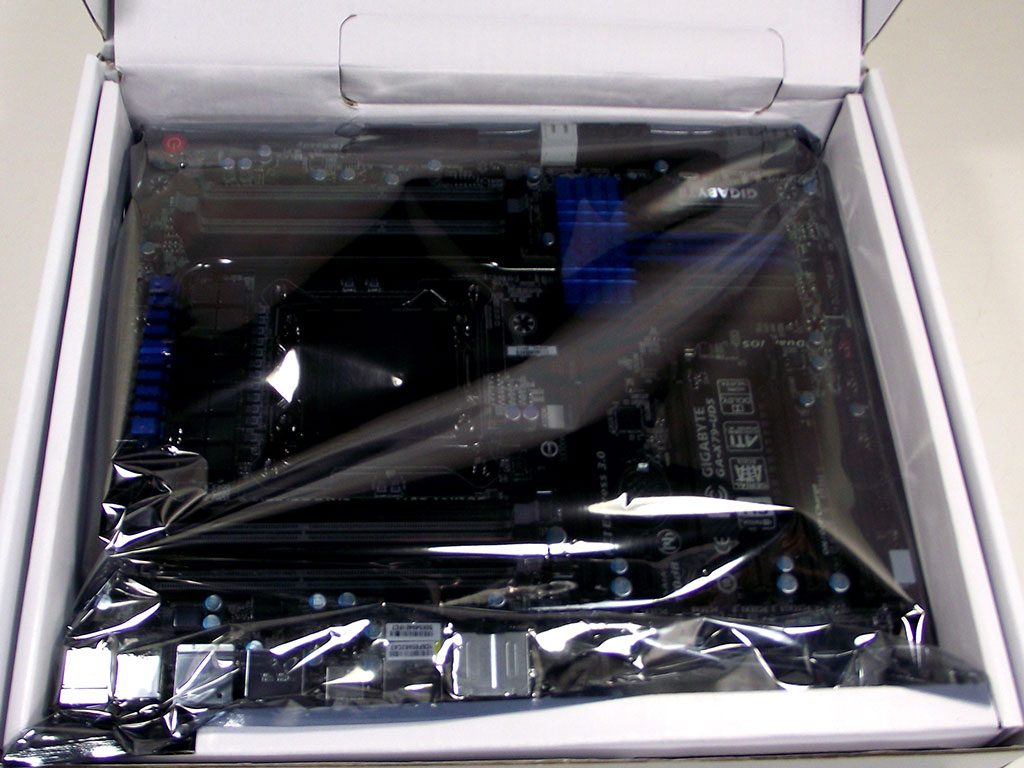

Lifting the inner flap reveals the board itself, covered with the usual
anti-static bag. Removing the board pulls its entire box out, and below
we find all of the board's literature and accessories, separated from
each other by cardboard partitions.
Contents
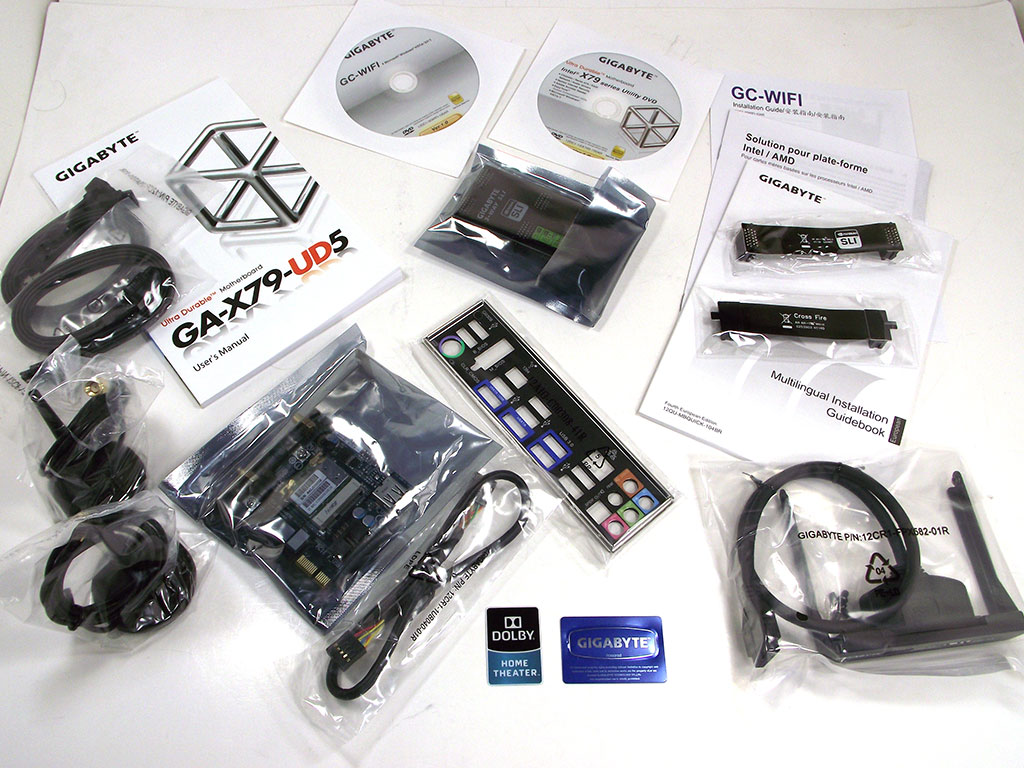
There's a huge amount of goodies inside the Gigabyte GA-X79-UD5's box,
including manuals, cabling, multi-GPU bridges, and even a couple of
discs containing software. We were surprised to find a complete PCIe
WiFi/Bluetooth 4.0 expansion card with matching antennas in the box too!
A full listing is below:
- 1x I/O Shield
- 1x User Manual
- 3x Quick Install guide
- 1x SLI Bridge
- 1x 3-Way SLI Bridge
- 1x Crossfire Bridge
- 1x Driver CD
- 1x WiFi Driver Disc
- 4x SATA 3 Gb/s cables with locking pins
- 2x Wi-Fi Antenna
- 1x Dolby Case Badge
- 1x Gigabyte Case Badge
The Board - Layout
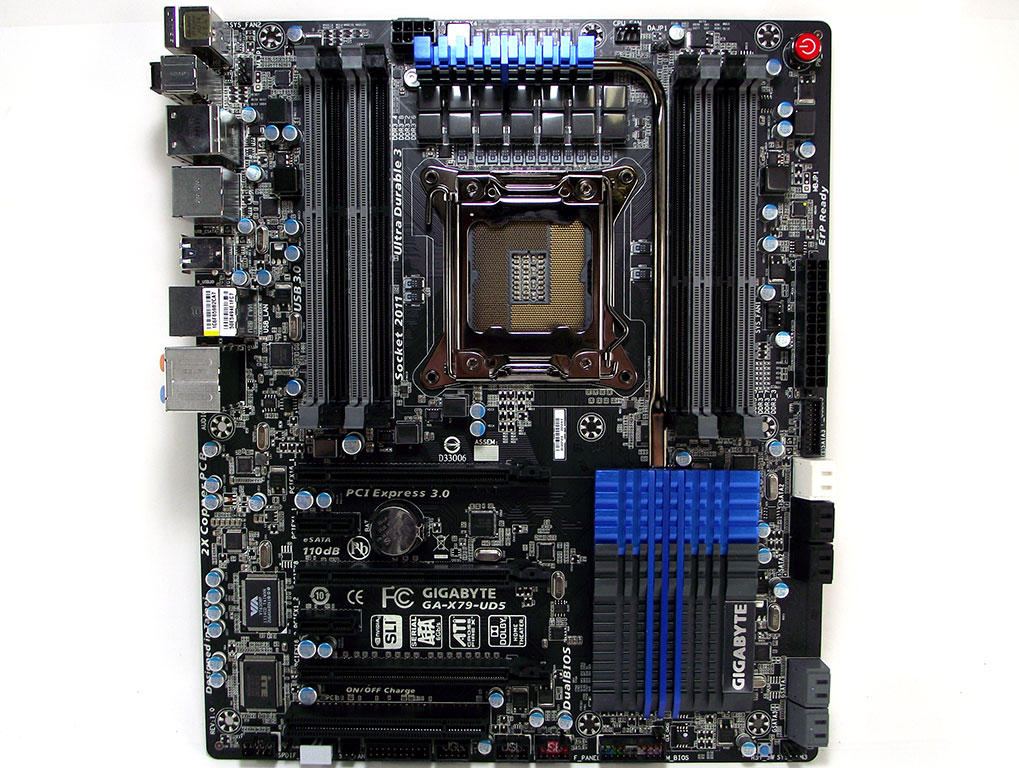

Dressed all in black except for a slash of blue and grey, the Gigabyte
GA-X79-UD5 has a fantastic stealthy look to it, thanks to the matte
black PCB. Like all Intel X79 Express products, the surface is quite
busy, and populated with a ton of surface-mounted parts, but it all just
kind of blends into the background thanks its aesthetic design. The
rear of the board is quite clean considering, with the VRM components on
the rear a fair distance from the socket blackplate. It's also nice to
see that all the heatsinks are attached with screws, rather than cheap
plastic pins, a small touch that for quite a few users goes a long way.


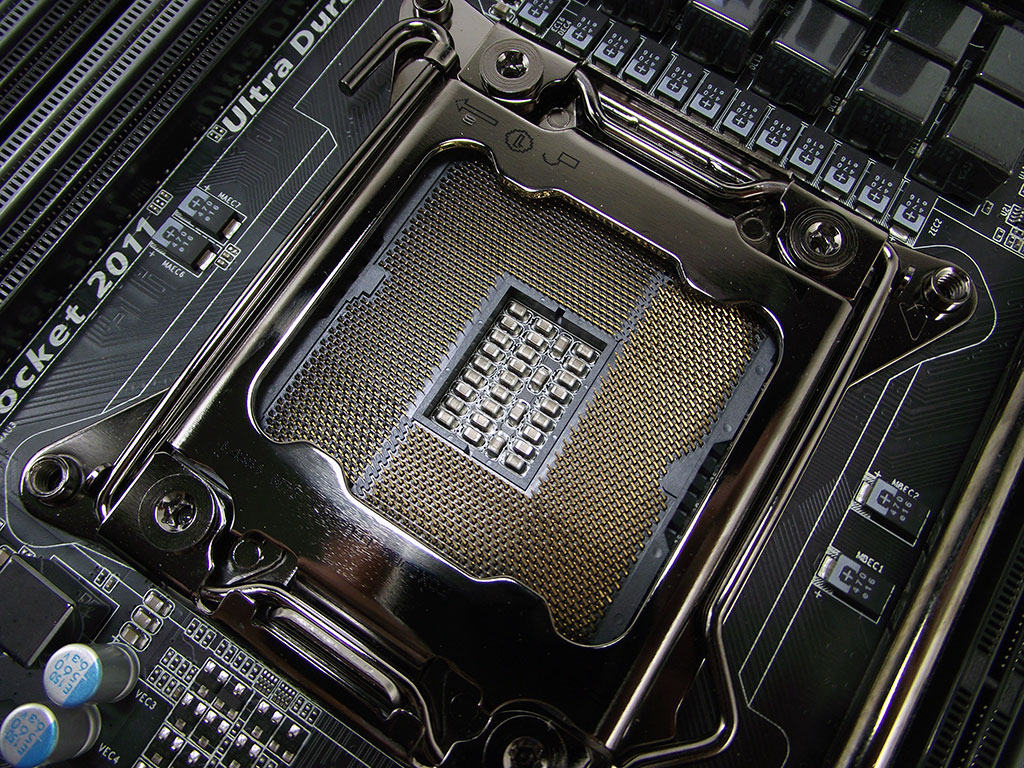
Taking a look at the socket area, we find the usual clutter of bits and
bobs that are around all Intel X79 Express sockets, including the
ever-so-close DIMM slots on either side. There's not a lot of room for
those looking to insulate around the socket to protect the board for
extreme clocking attempts, and those that use aftermarket cooling are
going to have to consider the proximity of the DIMM slots if using a
larger cooler. The rear of the socket is pretty plain, and we did notice
quite a few tiny components around the backplate, but thanks to the
clever Socket 2011 mounting system, this should not be an issue for most
users. The socket itself has quite a few parts in the middle of the
socket, and we're happy to see every spot populated, rather than places
for components that are not filled.
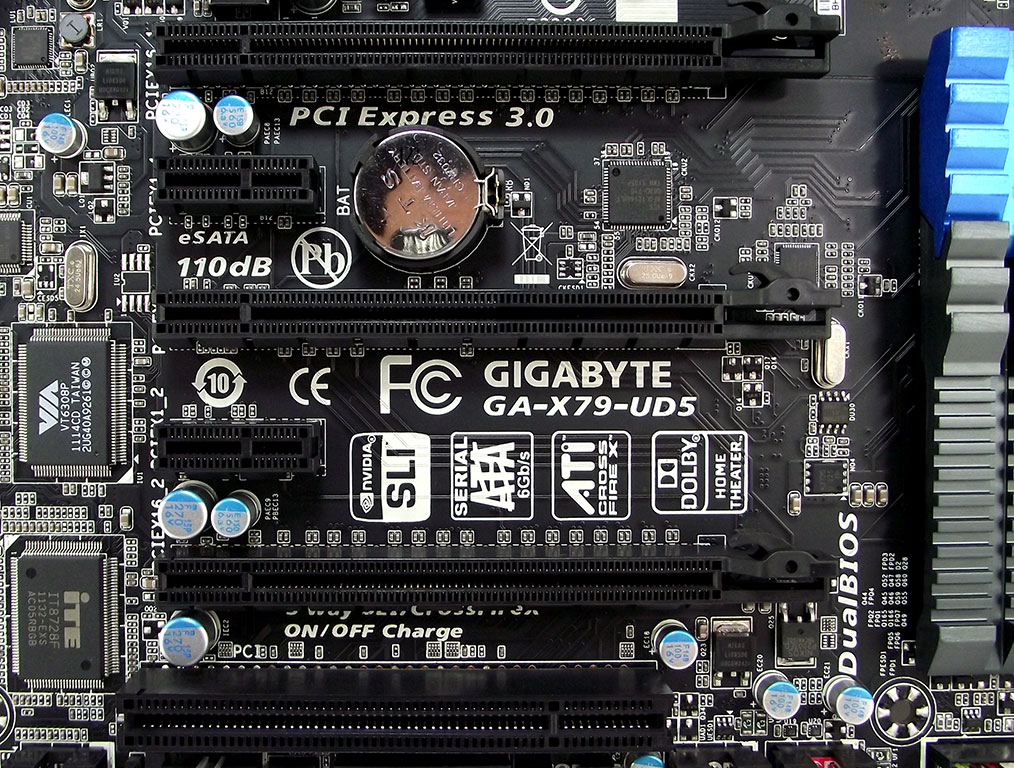


The bottom half of the motherboard is filled with six expansion slots;
three PCIe 2.0 x16 slots (electrically two x16 slots and one x8 slot),
two PCIe 2.0 x1 slots, and a single PCI slot, for those that need one.
The Gigabyte GA-X79-UD5 features eight DIMM slots for up to a maximum of
64 GB of memory (8x 8 GB), and has two single-phase power delivery
systems, one for each bank of DIMMs. The two banks run along each side
of the socket, with the grey slots seen in the two images above intended
to be populated first.


There are several pin headers along the board's bottom edge, with audio
headers starting on the left, next to an IEEE 1394 header, and fan
header, and a port for TPM module. There are three USB 2.0 headers in
the middle, followed by the front panel pin block, a RESET button, and
finally, a fan header right next to the right edge. There are a total of
five fan headers on the Gigabyte GA-X79-UD5, with three of them being
4-pin PWM headers, while the other two, the two on the board's bottom
edge, are of the standard three-pin type with RPM sense. The CPU_FAN
header can be controlled separately from the other two PWM-based
headers, labeled SYS_FAN1 and SYS_FAN2, which are joined together in the
same control grouping. The other two 3-pin fan headers get their own
SmartFan control as well, and all three can be set to their own profile
from within the BIOS, or from within the OS using one of the provided
software tools.
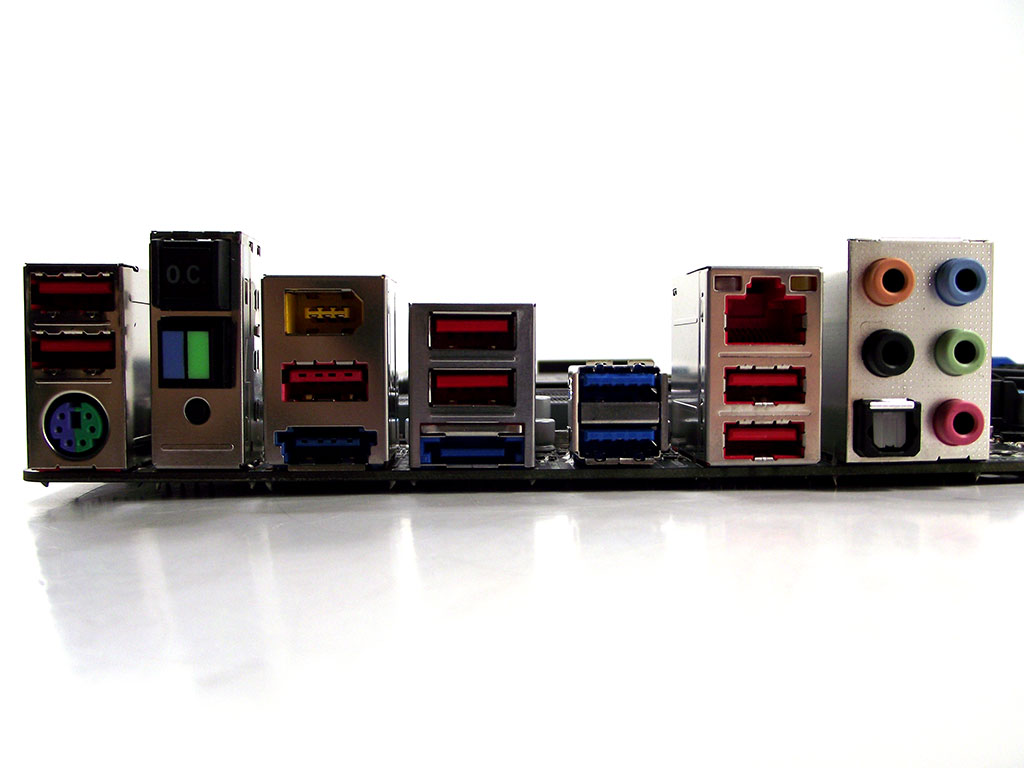

On the back plate we find, starting from the left, two USB 2.0 ports,
and below, a PS/2 mouse/keyboard combo port. Next to that are the BIOS
and "O.C." switches, followed by a tower with FireWire, USB 2.0, and
eSATA ports, all stacked on top of each other. Next to that we find a
single eSATA 6 Gb/s port matched with two USB 2.0 ports, and then a
little tower with two USB 3.0 ports. The LAN port is on top of yet two
more USB 2.0 ports, bringing the total number of USB 2.0 ports found
here to eight, if you include the one hidden in the eSATA/USB combo
port. The audio tower rounds things out, with five analogue audio ports,
and one digital audio port.
There are a total of ten internal SATA ports on the Gigabyte GA-X79-UD5, six of which are SATA 6 Gb/s capable (four grey and two white). The black SATA 3 Gb/s ports and white SATA 6 Gb/s ports are driven off of the Intel X79 Express chipset, while the two grey SATA 6 Gb/s ports are managed by dual Marvell controllers mounted to the board's surface just behind the ports.
The Board - A Closer Look


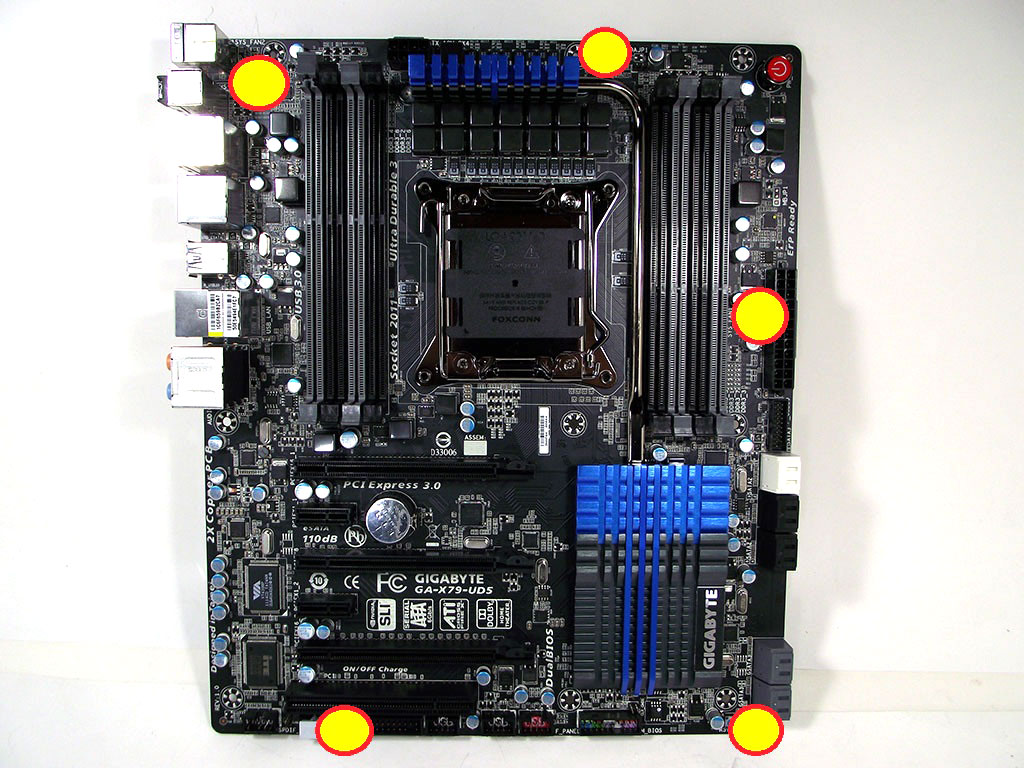
Up in the top-right corner of the Gigabyte GA-X79-UD5 we find a bright
red, high quality ON/OFF switch as shown in the first image above, one
that closely resembles the TPU logo you see in your browser tabs. It's
in a slightly weird location, all the way up at the top, made even more
puzzling by the fact that the RESET switch is found on the bottom right
of the board, shown in the second picture above. This layout is actually
pretty useful to those that use open-air test benches, as more often
than not, the right edge is what faces the front of a test bench. ON/OFF
on one side, and RESET on the other makes sense in this situation, but
otherwise, it's actually quite inconvenient. However, it also hints that
this board was made to be put into a test bench as used for
overclocking, but we would have much prefered to have the RESET and
ON/OFF switches close together, even if both are way up at the top like
the ON/OFF button is here.


The BIOS solution that Gigabyte provides is actually rather complex, but
we prefer to think of it as a highly refined "Dual BIOS" implementation
that Gigabyte has been providing for at least a decade. Using dual
matched Macronix 64 Mb ROMs as shown in the first image above, the
Gigabyte GA-X79-UD5 features one of the most functional hardware BIOS
solutions we've ever seen, primarily controlled via the buttons on the
back panel seen in the second image above. The lower button, as
non-descript as it is, allows users to chose which Macronix ROM they are
booting from, allowing a quick and easy way to swap between stock and
overclocked profiles, or for easy recovery from a failed boot due to
improper settings when overclocking. Beyond you pushing the button in to
activate the back-up ROM, the board itself will automatically switch to
the backup ROM itself after several failed boots, and if the main BIOS
becomes corrupted, the board will automatically flash a new working copy
from the back-up ROM, too. Pushing the "O.C." button will enable an
automatic system overclock while at the same time enabling the XMP
v1.2/v1.3 memory profile, if your DIMMs support either version.
This is the first time that Gigabyte has provided such an easy way to
make use of the multiple BIOS ROMs that they have been shipping on
countless products, for years and years. It's simple and easy to use,
still provides the same functionality that previous iterations have, and
then some, while finally providing the end user with a choice that
really expands overall functionality of the entire product, something
that goes a long way for those that like to benchmark and push their
system to the limit.


System monitoring functionality is provided by an ITE IT8728F, a chip
we've seen before a few times now, responsible for sensor data
monitoring and fan control. The primary voltage controller is another
ITE part, and IT8275E, which was also on the G.1 Sniper2 we reviewed
quite some time ago. The ITE IT8275E serves as the "brain" of the VRM
system, providing voltage monitoring and calibration, reading back data
from the other three phase controllers.


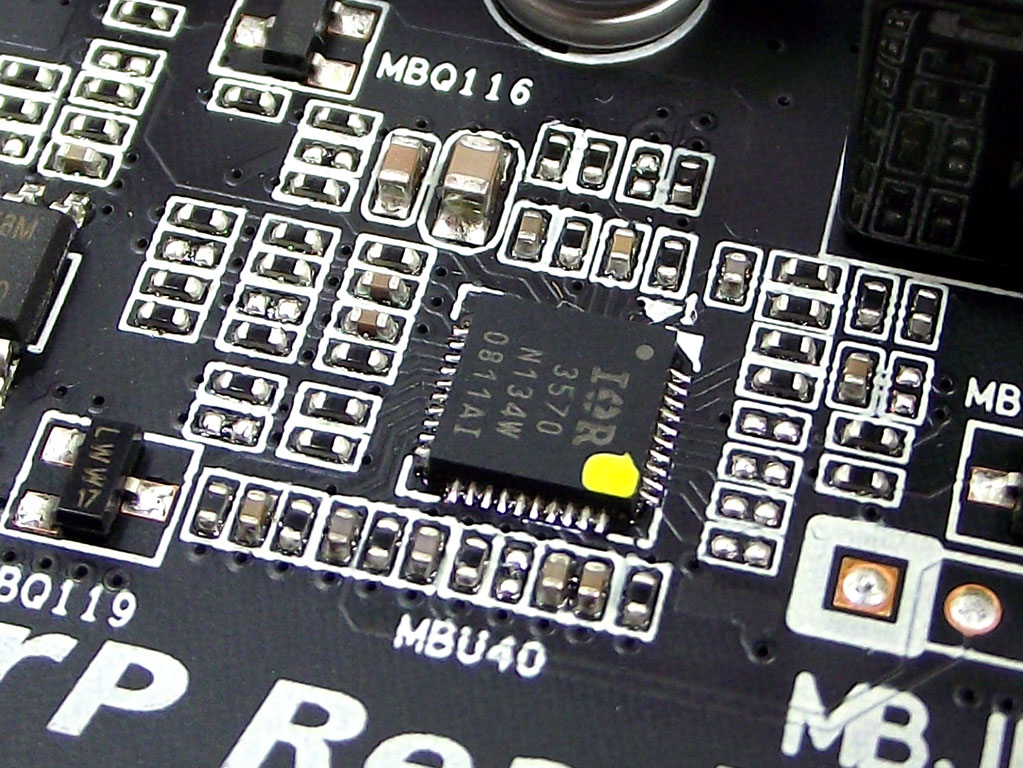
Those other three controllers are provided by International Rectifier,
seen in the three images above. From left to right, as they appear
above, they appear on the board itself, with the IR3570 seen in the
first image next to the left DIMM bank; in the middle is the IR3567
responsible for the CPU, and on the right we have the IR3570 that
controls the right DIMM bank. All three are digital controllers that not
only allow voltage to be set, but also the OCP limits, and frequency
that the individual VRM sections refresh at as well as V-Droop control.
Together they make a pretty powerful and highly customizable solution
that can very neatly meet the needs of even the most extreme users. We
mentioned earlier that this board was built for overclocking, and this
is yet another indicator that there might be more to this board than
first meets the eye.


The X79-UD5 features a standard hi/low VRM design with 14 total phases
for the CPU itself. There are a total of ten phases dedicated to the CPU
cores, pushed with five dual-channel input drivers that are found on
the rear of the motherboard. The other four phases are for the System
Agent and VTT domains, each in a pair with their own dual-channel input
driver that is hidden under the VRM heatsink behind the EPS 8-pin
connector. It's worth noting that the input drivers are balanced with
several surface-mounted capacitors on the front side of the board, seen
in the third image above. It's not often we see capacitors on both the
input and output stages, but this new all-digital VRM design from
International Rectifier that Gigabyte employs on the GA-X79-UD5 is
pretty robust, that when combined with the DIMM VRMs, offers a level of
customization not seen outside of Gigabyte's Intel X79 Express products.


The above two pictures show the two DIMM VRMs, the first image showing
the VRM for the right bank, and the second showing the VRM for the left
bank. Each VRM section is located as close as possible to the DIMMs they
power, in order to eliminate line noise and line interference from
other onboard parts. Each phase for the DIMM VRMs has its own input
driver and high/low MOSFETs, as well as chokes, capacitor, and
controller. It appears as though perhaps the DIMM phases could have been
a bit more robust, with an area under and next to the hex-FET that
appears to have been designed to hold a larger component. We'll have to
investigate the memory clocking situation later.

The PCIe subsystem is very basic. Each of the PCIe slots is directly
connected to the CPU, with only the ICS 9FGL1214AKLF clock buffer seen
in the image above as an outside component. With all of the LGA 2011
CPUs supporting 40 total PCIe lanes, there is no need for switches or
anything else with just three PCIe slots, two with x16 links, and the
third with a x8 link.


The included Realtek ALC898 HD codec supports 7.1 audio, and meets
Microsoft's WLP3.x audio requirements. Supporting 44.1k/48k/96k/192 kHz
sampling at 16-, 20- and 24-bit, the Realtek ALC8989 includes full
support for HD audio formats featuring Content Protection, if supporting
software is used. It is also DirectSound 3D compatible, so no area of
usage or functionality is overlooked, including support for Dolby Home
Theatre. Gigabyte has sourced the LAN controller for the GA-X79-UD5 from
Intel, fitting the GA-X79-UD5 with the Intel 82579V which meets the
802.3az Energy Efficient Ethernet appliance standard.


For extra drive support via the eSATA and internal SATA ports, Gigabyte
has equipped the GA-X79-UD5 with no less than three Marvell 88SE9172
controllers, with the one in the first image above powering the extra
two eSATA 6 Gb/s ports, and the other two controllers, in the second and
third images, manage the grey internal SATA 6 Gb/s ports found on the
right board edge. All of the Marvell controllers support RAID 0 and RAID
1.


For USB 3.0 support, we find dual FrescoFL1009-2Q0 PCIe controllers, one
for the internal header that provides USB 3.0 to casing front panels,
and one for the ports on the rear. The VIA VT6308P in the third image
above provides the GA-X79-UD5's IEEE 1394 FireWire support, powering
both the port on the rear I/O as well as the internal header found on
the board's bottom edge.


The Gigabyte GA-X79-UD5 includes a separate Bluetooth 4.0 and WiFi card
that uses both the PCIe bus, as well as USB 2.0. The two separate
devices occupy the same card, but feature separate antennas and
interfaces. Because only one USB 2.0 port is used, the card has a USB
2.0 port built on it, but we're not exactly sure why, as it is not the
sort of port that can be wired to the case exterior, but rather a normal
USB 2.0 port you might plug your keyboard or mouse into. It's nice to
have access to the unused port, but it could have been provided in a
slightly better way, like perhaps sticking out the same end as the
antenna receptacles.


With all the heatsinks removed, we can easily see the heatpipe that
joins them. We were actually quite surprised to find that looking at the
cooler like this made the VRM portion seem so small, and small it is.
The piece that sits on the Intel X79 express chipset seems to actually
do most of the cooling, making us wonder if there could not have been a
more effective solution, however, under high load testing we found the
cooler to do a more than adequate job, as we noticed no throttling at
any point, even when pushing 280 W through the EPS 8-pin.


Looking closer at the southbridge cooler we can see that it is composed
of two separate pieces of metal that have been machined to increase
surface area, and then anodized. From below we can see the contact area
that the Intel X79 Express chipset comes into contact with, with the
heatpipe from the VRM cooler passing over just one side where the
chipset would be, like we saw on the ECS X79R-AX.


The VRM cooler, as we mentioned, is quite small, and like the
southbridge cooler, is also made up of two anodized pieces of aluminum.
Looking at the contact pad we can see very distinct impressions made by
the International Rectifier hexFETs, so while the cooler is small in
size, it definitely makes good contact with the parts that need cooling.

In the above picture you can clearly see the new Intel X79 Express
chipset, found under the large southbridge cooler. The chip itself is
fairly large, and while we are used to seeing the Intel X79 Express
chipset surrounded by a complex array of surface mounted bits on the
board itself, the Gigabyte GA-X79-UD5 seems to provide a much more
simple assembly.
BIOS Walkthrough


The Gigabyte UEFI BIOS is something completely new for Gigabyte, having
left the AWARD BIOS behind, and introducing their first foray into UEFI
with a fully licensed AMI BIOS. This completely new take on BIOS design
greets us with a picture of the board itself once the board is powered
up and the POST process has completed, with several buttons along the
bottom that lead into other areas. Of course, mouse support is included,
and you can navigate between areas by clicking on the appropriate area,
with the active areas highlighting with blue once the cursor hovers
over them. The menus that pop up when clicking between sections are
actually quite in depth, and offer far more functionality than we've
seen from other UEFI BIOS implementations. Pretty much most of the
critical options are available, as seen in the screens above.


There are even menus to enable or disable devices, drive controller
setup, and every other really critical option is all accessible via the
graphical interface. Of course, it does take a bit of navigation to get
from section to section, and perhaps the click path could be a bit
better optimized, but considering this is Gigabyte's first foray into
AMI BIOSes, we were pretty impressed.


Even clocks and voltages can be set, and as you can see by the first
image above, there are even monitoring panels that pop up when in the
voltage and clock sections, which help make deciphering the menus
easier, as the new interface can be a bit overwhelming at first. We
really like the new styling, one that is most definitely unique to
Gigabyte.
Of course, the graphical interface isn't the only way to adjust settings in the GA-X79-UD5's BIOS, and a quick press of "F1" will have an "old-style" interface pop up that will be quite familiar to most users, as seen in the second image above. The page that pops up has all the regular "Motherboard Intelligent Tweaker" options we are used to seeing from Gigabyte, although due to the complex nature of the GA-X79-UD5's VRM, we are presented with a fair bit more to tweak. As always, the "Current Status" page leads us to a page that shows the current installed CPU and memory, and what settings they are currently running, as you can see in the third image above.


Entering the "Advanced Frequency Settings" heading leads to a page that
provides access to clock and multiplier adjustments. The BLCK
adjustments available are kind of limited, only scaling between 80 MHz
and 133 MHz, but an option below allows the BCLK divider to be chosen,
making the actual clock vary in a greater degree. There is also a
listing for the PCIe clock, a nice treat that shows how the PCIe clock
scales when the BCLK is adjusted.
Although the BCLK can be adjusted a lot more with the Intel X79 Express platform, the PCIe clock is still tied to the BCLK, and the dividers provided merely adjust the ratio between the two, from 1:1 to 1:0.8. or 1:0.6.
The memory settings page, seen in the second image above, follow the format seen in the older AWARD-style BIOSes that Gigabyte used on other products, although when set to "Expert" mode, timings can be adjusted per channel. The available timing adjustments are pretty in-depth, seen in the third and fourth image above, although there are perhaps a couple of options that we would have like to have seen added. There were a couple of timings that didn't offer the actual settings our XMP v1.3 DIMMs were qualified for, so there is definitely room for improvement here, but again, as a first foray into an AMI UEFI BIOS, we are pretty happy with what's offered.


The "Advanced Voltage Settings" tab leads into the sub-menu seen in the
first image above. We have four options total, one for the VRM
adjustments, one for CPU voltage control, another for DRAM voltages, and
finally, one for chipset voltage. The VRM adjustment page contains
settings for the VRM itself, including LLC and OCP limits, frequency of
the VRM itself, as well as a few other options, all shown in the second
and third images above.


The three images above show the three voltage setting pages that we
haven't talked about yet, one for the CPU, one for thememory, and the
third for the chipset voltage options. There's not a lot to say about
these pages, other than that all the needed options when overclocking
are provided. Perhaps all of the options could have been compressed into
one single page, improving the click-flow. They'd even all fit in one
page and still all be visible, so this is one area that we feel could be
improved, although the way it is laid out currently does make a lot of
sense, too.


There are two more heading under the "M.I.B." section, one for "PC
Health Settings", and the last labeled "Miscellaneous Settings". The
Health Settings page leads to monitoring data and SmartFan adjustments,
shown in the first two images above. The "Miscellaneous" page, shown in
the third image above, contains just one setting, but even that single
setting was removed and placed elsewhere with the updated "F7" BIOS. The
fact that this page remains now with the "F7" BIOS, even with no
options inside, highlights that there are definite improvements to be
had here that Gigabyte could easily implement. We hope to see those
changes take place soon with an updated BIOS.

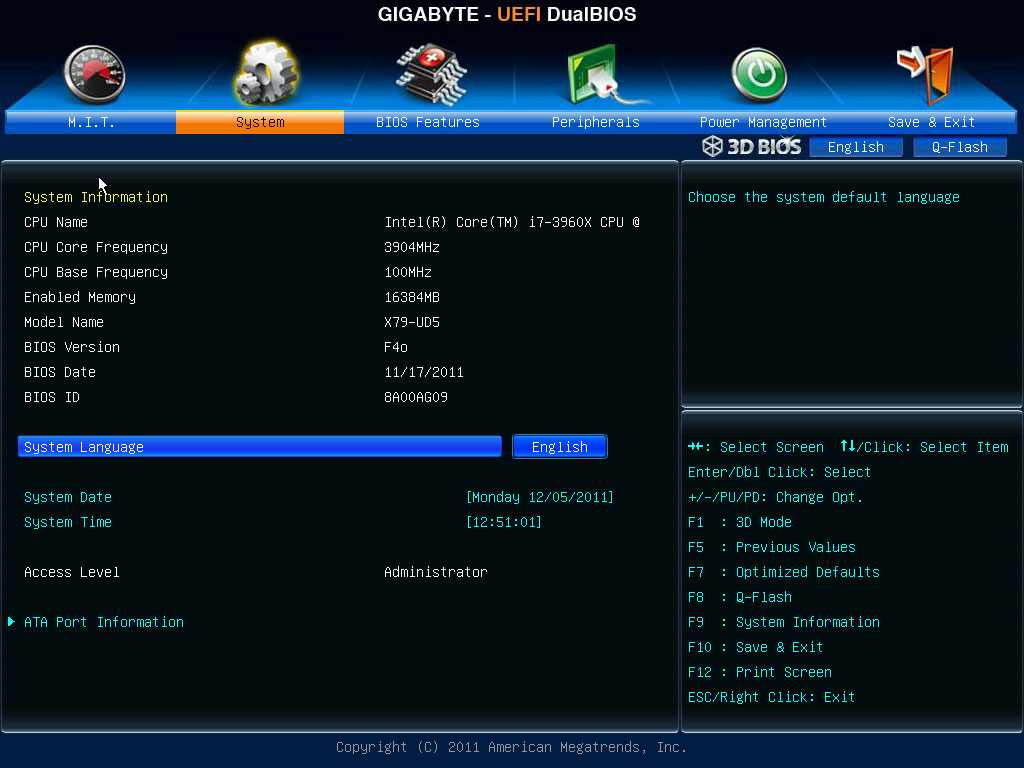
 Now that we've looked at every page under the "M.I.B." tab, the "System"
tab leads us to a very normal page, containing settings for date and
time, as well as a heading that leads us to a section that lists
information for the internal ATA ports, shown in the second image above.
A purely informational page, the ATA Port Information page lists all of
the devices plugged into the ports connected to the Intel X79 Express
chipset.
Now that we've looked at every page under the "M.I.B." tab, the "System"
tab leads us to a very normal page, containing settings for date and
time, as well as a heading that leads us to a section that lists
information for the internal ATA ports, shown in the second image above.
A purely informational page, the ATA Port Information page lists all of
the devices plugged into the ports connected to the Intel X79 Express
chipset.


The next tab up is called "BIOS Features", and contains settings for
boot options as well as a few CPU-specific options, such as
Virtualization and NX-bit. The second and third images above show the
"Peripherals" tab, which contains settings for all the onboard devices.
There is also an option at the bottom of the page that lists settings
for the onboard Marvell drive controllers, pictured in the third image
above. In this page you can configure the mode the controls work in,
RAID, IDE, or ACHI, or you can disable the controller entirely, if you
do not plan to use the ports that connect to it.

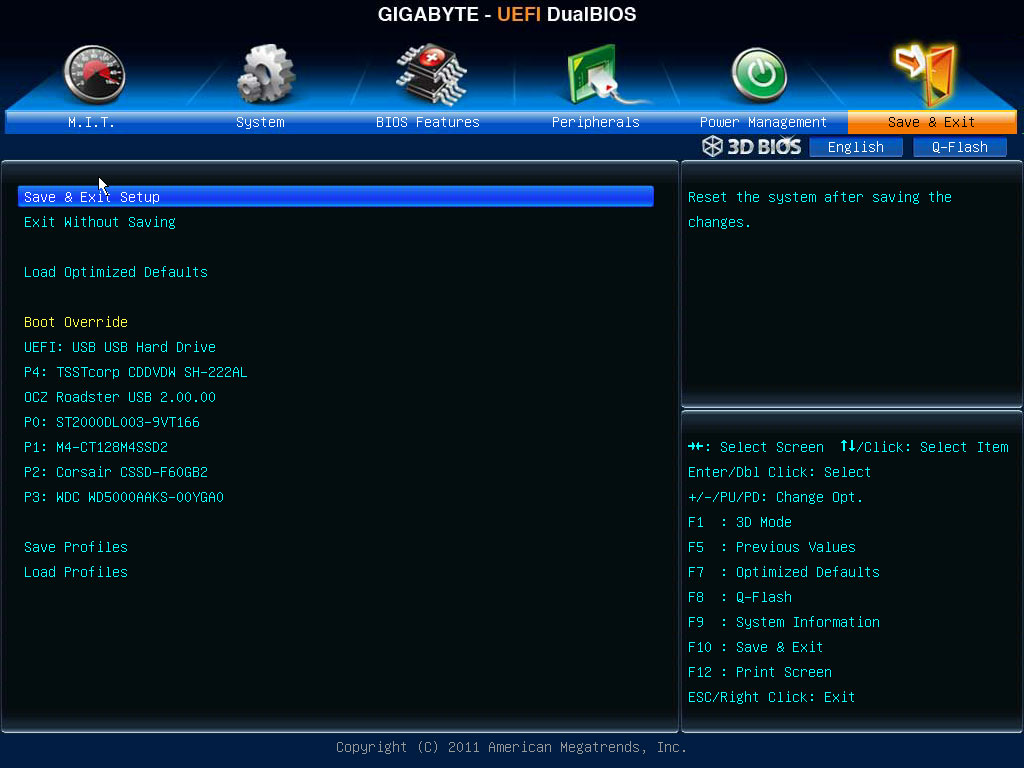
The last two pages are the "Power Management" page, which contains all the power-related settings that relate to board boot-up and wake settings, and the "Exit" page, which also provides a place to store profiles, as well as giving the option to boot from other installed drives directly, rather than the chosen primary boot device.
There is also a button visible at all times when in the standard BIOS layout on the top right, labeled "Q-Flash". This item will allow you to flash the BIOS to another version via a provided utility that makes the process very simple. All you need to do is place the BIOS on a FAT32-formatted USB drive, boot with the drive connected, and then point the Q-Flash utility to it, and it will take care of the rest. It's worth noting that if the board boots and recognizes that the BIOS on the primary ROM is newer than the one of the back-up ROM, it will automatically flash the newer BIOS to the backup ROM.
There is also a button visible at all times when in the standard BIOS layout on the top right, labeled "Q-Flash". This item will allow you to flash the BIOS to another version via a provided utility that makes the process very simple. All you need to do is place the BIOS on a FAT32-formatted USB drive, boot with the drive connected, and then point the Q-Flash utility to it, and it will take care of the rest. It's worth noting that if the board boots and recognizes that the BIOS on the primary ROM is newer than the one of the back-up ROM, it will automatically flash the newer BIOS to the backup ROM.
We are left pretty impressed with Gigabyte's first foray into an AMI UEFI BIOS implementation. There are a few issues we found with the click-flow that could be optimized, but overall, the BIOS itself is very functional, and boots far faster than previous AWARD implementations. Gigabyte did recently make some waves in the industry with their recall of older BIOSes, which at first were taken as a recall of the boards themselves, after a user published video online of a Gigabyte Intel X79 Express-based product failing. We did subject our board to similar conditions as presented in the video and found no problems with our own board sample, using a previously released BIOS. We also undertook the same tests using the new "F7" BIOS, and found that the power consumed by our sample actually INCREASED with the new BIOS, rather than being lower as expected, and this alone alleviated any concerns we might have had about the board's VRM design. We tried to push our board to the point of failure, and were pleased to find our board rock-solid, no matter what BIOS version we used. It's perfectly natural for a whole new BIOS designs to have a few bugs, but in the end, we really like Gigabyte's AMI UEFI BIOS, and cannot wait to see how it evolves over time.
Board Software


For included software, we find the long-lived standard of EasyTune for
board-level tweaking, wrapped in the same old and familiar interface.
The tool itself provides listings of system information for both the CPU
and the memory, as well as providing access to voltage and clock
adjustments, as seen in the images above. There is a section for
automatic overclocking profiles as well as manual settings, and as is
usual for high-end boards, we found the voltage section to offer a
multitude of settings that can all be adjusted from within the OS.


EasyTune6 also provides access to SmartFan controls, as well as
providing a bit of monitoring capabilities, shown in the second and
third images above. In all honesty, we find the EasyTune software a bit
clunky, and much prefer to access all of these options from the BIOS,
rather than from within the OS as quite a few settings still require a
reboot before they can be applied. Having used this same tool for years,
we really feel it is ready for an update.


What has been updated, however, is the software VRM interface, this time
called "3D Power". The four images above show the menus of that
software interface, which provides access to all the same VRM options we
found in BIOS. It is a nice and easy-to-use software, but again, we
much prefer to make such adjustments from within the BIOS itself. At the
same time, those that wish to do a bit of tweaking from within Windows
do have the option if so desired.

The final piece of software is another familiar one, called "Smart6".
Providing an interface to six other tools, the Smart6 panel leads into
the software shown in the images below.


We find monitoring software, access to quick-boot options, options to
set profiles for the BIOS and lock them with a password, a quick
overclock utility, and finally a software called Smart Recovery 2, which
provides a tool for system back-up. All of the tools are easy to use,
and have been around for a while, so are quite stable as well.
The entire software suite is fairly robust, but it's one area that hasn't seen a lot of changes with the new series of products. All of the software works really well, but we would have been a bit happier with even something as simple as a new skin to match the new products, or something similar to present to software in a new way, but we also like having familiar tools to work with, too.
The entire software suite is fairly robust, but it's one area that hasn't seen a lot of changes with the new series of products. All of the software works really well, but we would have been a bit happier with even something as simple as a new skin to match the new products, or something similar to present to software in a new way, but we also like having familiar tools to work with, too.
Test System

Initial Setup


Setting up the Gigabyte GA-X79-UD5 went by without any issues, no
different than any other motherboard, with the JEDEC 1600 MHz
11-11-11-31 1.5V profile of our G.Skill DIMMs booting right up. The OS
install went perfectly, and no issues were noticed at any point during
our testing period, even when overclocking. With the release of the new
"F7" BIOS just after Christmas, we spent the few days right after
re-testing everything, including the OS install, and found nothing worth
mentioning, other than that everything worked as expected, with no
hiccups.
PWM Power Consumption
Since one of our first tasks was to truly
verify system stability, while doing so we measure CPU power
consumption. We isolate the power coming through the 8-pin ATX connector
using an in-line meter that provides voltage and current readings, as
well as total wattage passed through it. While this may not prove to
isolate the CPU power draw in all instances, it does serve as a good
indicator of board efficiency and effective VRM design.


The Gigabyte GA-X79-UD5 at idle, sipped the power, pulling just four
watts from the 8-pin EPS connector. With the new "F7" BIOS flashed on to
the board, we found that load power consumption increased a fair bit
from the previous BIOSes, pushing the Gigabyte GA-X79-UD5 into territory
no other boards sits in, with a total of 155 watts pulled via the 8-pin
connector. This is a full 25 watts higher than any other tested Intel
X79 Express product, and is also a 26 watt increase from previous
BIOSes, which showed similar power consumed to the other products we
tested in the past few weeks. We are not exactly sure why it is so much
higher at stock, so we pushed the system to the limit, and found not
only could we go further, but that power consumed during overclocking
had reduced by nearly 25 watts. The new BIOS is definitely different in
how it manages the VRM, and in a good way for those that are planning to
overclock, as pushing further while consuming less power is not a small
thing, at all.
CPU Performance Results
We spent a couple of weeks with the
Gigabyte GA-X79-UD5 before beginning our performance testing, running
various configurations and CPUs, and checking hardware compatibility. We
verified our power consumption numbers using various different power
supplies, and played a few hours of games with some members of the TPU
community to get an overall feel for the board and to verify stability.
Once completed, we tore down the system, mounted our Noctua cooler and
put the board through the paces.
SuperPi

SuperPI serves as our memory-focused benchmark, being highly
single-threaded. The Gigabyte GA-X79-UD5 ended up on the top of the pile
of all Intel products we have tested, a good showing, for sure.
wPrime

wPrime is much more CPU-focused, but memory plays its role as well. In
this test, the numbers were much closer, but the GA-X79-UD5 was just a
bit faster than the ECS X79R-AX.
WinRAR

Part of our motherboard benchmarking suite is the built-in benchmark
that is part of the WinRAR software suite. In this test, the Gigabyte
GA-X79-UD5 put up good numbers, however, we noticed performance a fair
bit below what we noticed on the ECS X79R-AX, but also higher than the
ASUS P9X79 Deluxe we looked at just a couple of weeks ago.
AIDA64

We employed AIDA64's memory bench to highlight memory bandwidth. We
isolate the write performance metric as it serves as a good indicator of
overall memory performance. Again the GA-X79-UD5 ended up just above
the ECS X79R-AX, but only by 31 MB/s.
HandBrake Encoding

Handbrake is used for encoding testing, and provided results much similar to the previous benchmarks, with the Gigabyte GA-X79-UD5 sitting a nearly two FPS ahead of our previously best result.
CineBench Encoding


In Cinebench, the Gigabyte GA-X79-UD5 was a bit slower than the other
tested Intel X79 Express products on the GPU side, but the CPU portion
again showed the Gigabyte GA-X79-UD5 as the top performer, bar none.
3D Performance Results
Once we completed our CPU test suite, we
took some time to play some games with the TPU community to get an
overall feel for gaming on the GA-X79-UD5. After a couple of days we
settled in to complete our 3D benchmarking, feeling confident that the
Gigabyte GA-X79-UD5 was going to put on a good show. Let's take a look
at what numbers the board provided.
3DMark11

Once we ran 3DMark11, it became clear that a trend really was emerging,
one that has the Gigabyte GA-X79-UD5 as the fastest tested product to
date. The numbers again have the Gigabyte GA-X79-UD5 a fair bit above
the ECS X79R-AX and ASUS P9X79 Deluxe.
Civilization 5

Our first real-world 3D performance test comes in the form of
Civilization 5, using the included benchmark. We let the game recommend
us settings, and then disabled V-SYNC and AA to eliminate bottlenecks
introduced by the GPU itself. Here the numbers were exactly as expected,
with very little variation compared to previous results. A problem in
this particular benchmark points to other issues, but the Gigabyte
GA-X79-UD5 passed with flying colors.
F1 2010

Our second real-world 3D performance test comes from CodeMasters, in the
form of the "F1 2010" included benchmark. We let the game recommend us
settings, which included 8xAA with our newly added HD6950 2GB from
Sapphire. Again we were impressed, as F1 2010 proves to be one of our
personal favorites, and the Gigabyte GA-X79-UD5 again noticed higher
performance than the other Intel X79 Express products we've tested in
the past few weeks. The Gigabyte GA-X79-UD5 even managed to beat out the
two top Z68-based results, too, something the other Intel X79 Express
products could not do.
With the CPU and 3D performance compares out of the way, we took a closer look at the other performance features offered by the Gigabyte GA-X79-UD5.
With the CPU and 3D performance compares out of the way, we took a closer look at the other performance features offered by the Gigabyte GA-X79-UD5.
Drive and Audio Performance Results
Our drive and audio testing differs a bit from the rest of our testing, for several reasons. First of all, when it comes to drive performance comparison, nearly every platform on the market is very close to one another, as most do provide external drive controllers which means the numbers offered are very much platform agnostic. And finally, with audio, we do not list any numbers except for those reported by the product we are testing in order to provide the most information possible, as each audio CODEC will behave quite differently, and each board does not employ the same CODEC. As such, there is no standard we can use other than the numbers themselves. You can always check our other motherboard reviews in order to make direct comparisons to audio performance.We've tested each drive interface separately in order to provide the most complete numbers possible. Employing HDTune Pro for all of the testing, we tested each drive outside of the OS environment, using a separate OS on a separate drive. However, we do use drives with a fair amount of data on them (60% full) to simulate performance in real-world situations.
HDTune Pro (SATA2)

In HDTune Pro SATA 3 GB/s performance, we found the Gigabyte GA-X79-UD5
to return results exactly as expected, right near the top, and exactly
matched with the majority of products.

HDTune Pro (SATA 6Gb/s)
SATA 6 Gb/s showed nearly the same as SATA 3 Gb/s, with the GA-X79-UD5 just one tenth of a megabyte behind our top result.

HDTune Pro (USB3.0)
USB 3.0 drive performance failed to put the GA-X79-UD5 on top, but it's
only three tenths of a megabyte behind the best result, so nothing to
worry about, either.

RightMark Audio Analyzer
The RMAA results given by the Gigabyte GA-X79-UD5 are rated by RMAA as average, and that's really about all we can say. It is not particularly loud, but did produce considerable volume, but nothing really stood out for us. We've tested other Realtek ALC898 solutions and received better results, which proved shocking considering the nice Dolby software package that looks pretty. It would be nice if the quality matched. If we look at the numbers provided by RMAA directly, the bass is a bit heavy, while the treble is a bit thin, while volume was fairly decent. There was a bit of distortion noticed, seemingly produced via Stereo Crosstalk, which was fairly high. This leads to a very average performance, nothing overly bad, but nothing that knocked our socks off, either.
Overclocking


Overclocking with the Gigabyte X79-UD5 with the new "f7" BIOS was very
easy indeed, with the Gigabyte GA-X79-UD5 board out-clocking our ECS
sample by a full 200 MHz, matching our result with the ASUS P9X79
Deluxe. As we mentioned before, we also noticed much lower power
consumed via the 8-pin when overclocked, even less than the ASUS board,
so we ended up fairly satisfied with the result. One disappointing part
was that no matter what we tried, we were not able to get our memory to
boot at 2400 MHz, but we are fairly certain that this is due to the
limited range of some of the timings offered. Of course, clocking
results can change drastically with BIOS updates, but the results we got
with the new "F7" BIOS left little to be desired.
Overclocked Performance Summary

Cinebench provided a substantial performance increase when over clocked,
something that resounds true through the entire series of Intel-based
products.

Likewise, SuperPi 32m results proved the same as Cinebench, with
substantial performance increases that are also noticed on previous
Intel platforms, but the SB-E CPU core design does limit the increases
available in SuperPi.

WPrime 1024M numbers further the results, showing that there is true
power available when overclocking the Gigabyte GA-X79-UD5, dropping the
final result by a full 31 seconds when overclocked.

For a bit of 3D action we fired up CodeMaster's F1 2010 to be impressed
with the performance boost offered compared to the other products. This
does highlight that finally, with the Intel X79 platform offering
quad-channel memory support, we are already at near optimal performance
in this application, even at stock, while with P67 and Z68 products, we
managed to notice quite significant gains in performance that is just
not noticed here, as the end result did not even increase by even half
an FPS. With that, we can say that the Intel X79 Express platform, at
stock, is enough to push Codemaster’s titles to the max, which is pretty
impressive, to say the least.

With Codemaster's F1 2010 starting to show it's age, and proving less
reliable in showing performance increases, we've added the Shogun 2
DirectX 9 CPU benchmark to our testing suite. In the months to come, it
will get added to the main testing section, but for now, it does show a
very large increase in performance when run on the overclocked Gigabyte
GA-X79-UD5, being highly sensitive to single-threaded CPU performance.
The final result increased by almost 33%, much higher than we had
expected.
 |
|
|---|---|
 |
|
 |
|
Thanks to the direct-to-CPU PCIe configuration, 3D performance is as good as it can get, beating out every other product, and even 2D performance is on top as well. It's a bit unfortunate to see stock power consumption numbers so high, and we were also disappointed to find so few SATA cables in the box, and we have deducted points from the overall score because of these two issues, but with those two out of the way, Gigabyte really has a fantastic product here, offering better performance than other products for lesser cost.
Although many users may be turned off by the BIOS fiasco, testing has shown that there is nothing to worry about, and in the end, the Gigabyte GA-X79-UD5 is the best Intel X79 express product we have tested to date. With that, it's very easy for us to recommend this product to users looking to delve into the Intel X79 Express platform, even just if running stock, as the performance is high enough to warrant the extra power consumption in our books. Don't forget to hit us up in the forums with your own GA-X79-UD5 results!