

Packaging


NZXT packages the Tempest 410 chassis in a plain brown box. The front
holds an image of the chassis, while the rear goes into some detail
about the chassis features.
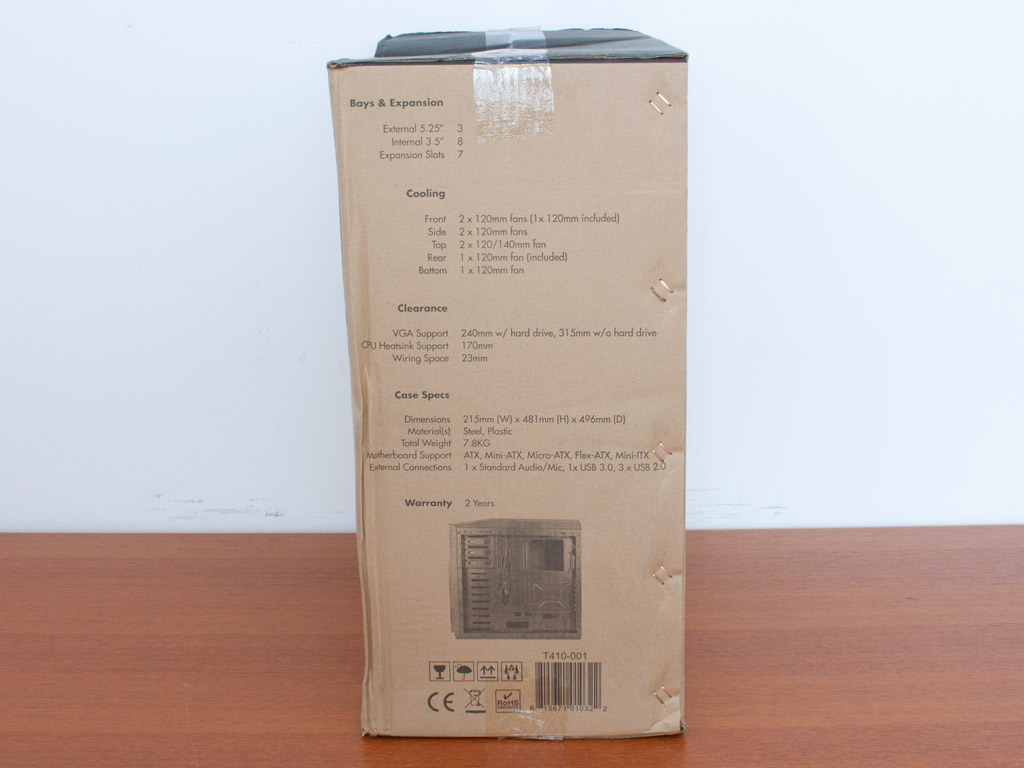
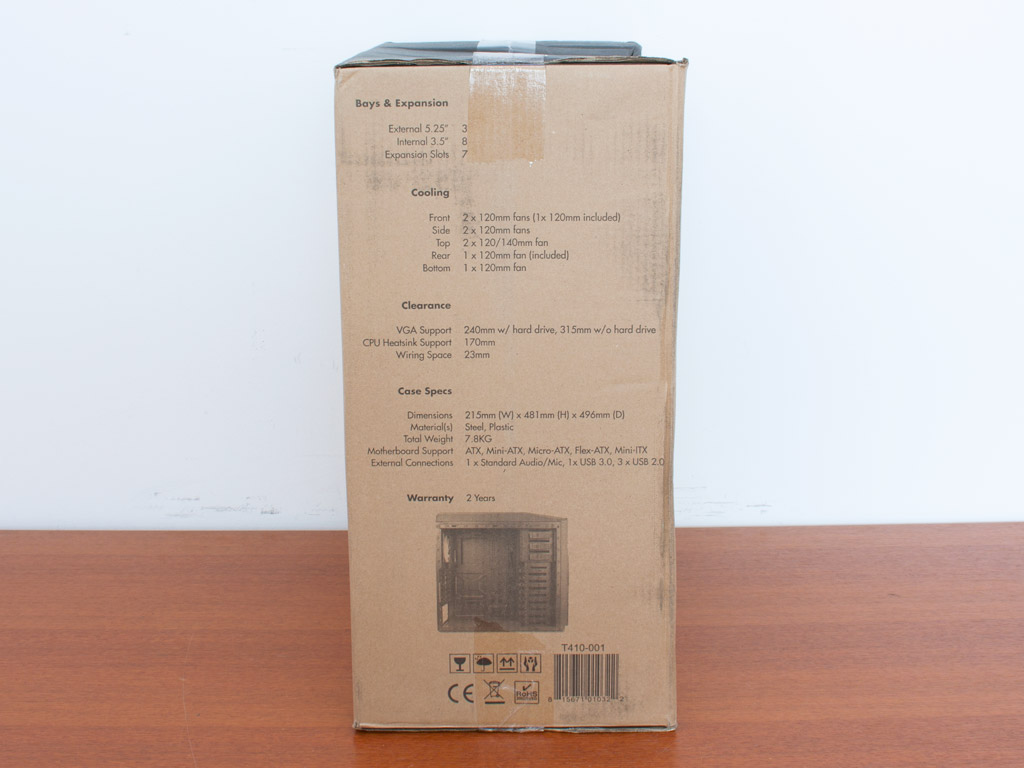
Both smaller sides of the package hold a list of specifications. The
only differentiating factor is the small image of the chassis. There are
no holes to grip the package, but the entire unit is light enough for
fairly easy transportation home from the post office.
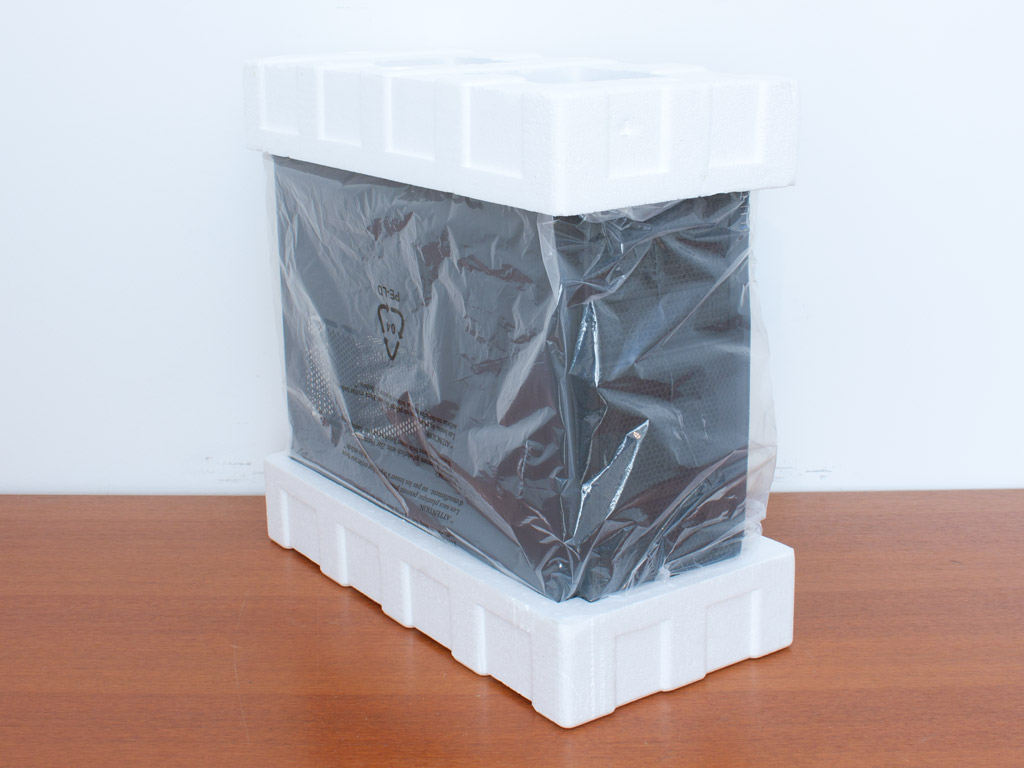
Even though the package was crushed a bit from the outside, there is no
damage to the case itself. It comes sandwiched between to Styrofoam
spacers and protected by a thin plastic bag.
Contents


You will receive a simple manual and a set of sorted screws. NZXT also includes a few zip ties for a clean case interior.
A Closer Look - Outside
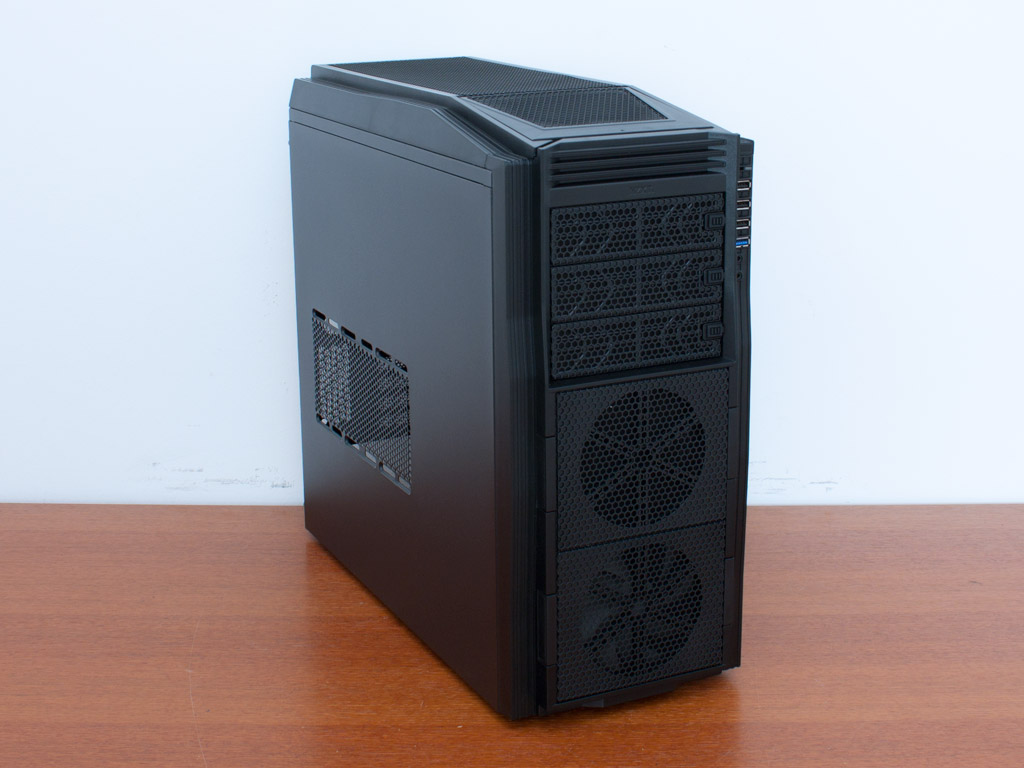
One of the most important aspects when deciding on a case is undoubtedly
the look of the unit. I am not sure how you feel about the Tempest 410,
but I think this is not the best work from NZXT in terms of the design.
While I am all for the industrial look, it seems very superficial and
repetitive. It may have been good to apply more smooth areas on the
front of the chassis instead of going all out. As it stands now, the
case looks alright, but is a bit overloaded in my humble opinion.
Luckily. everyone's taste is different.

As mentioned before, the front has a lot of straight and edgy lines.
That, in combination with the round cut-outs for the front fans and the
lack of real depth kind of blur the looks. In terms of construction
quality, the Tempest is quite good as most parts feel adequate for a
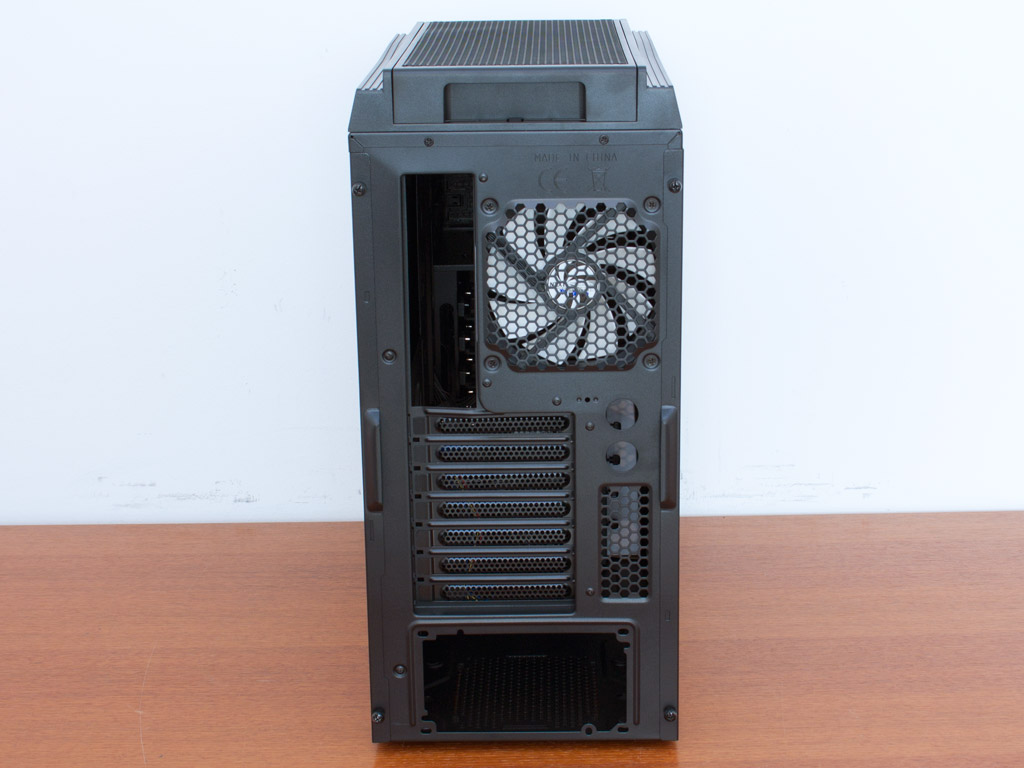
chassis of this price range. Turning the enclosure around, we can see
the white blades of the rear fan and the hint of an all black interior.


NZXT has created an opening in the main side panel, allowing you to
install up to two 120 mm fans. Thanks to the elongated holes, you have a
bit of flexibility on how to place these cooling units horizontally.
There is no dust filter on this area - something that would have made
sense here. On the other side you will find no holes openings or design
elements.


Taking a closer look at the bottom, there are two spots for 120 mm fans.
NZXT has employed the same system in the Tempest 410 as in the H2, as
both fan covers can be removed. One white bladed unit is included in
this area of the chassis. Thanks to the PCB and connecting pins, it is
quite easy to equip or exchange these cooling systems while the system
is running. Sadly, NZXT still does not allow for RPM signals to be
passed on to the fan PCB, as there are only two connecting pads.
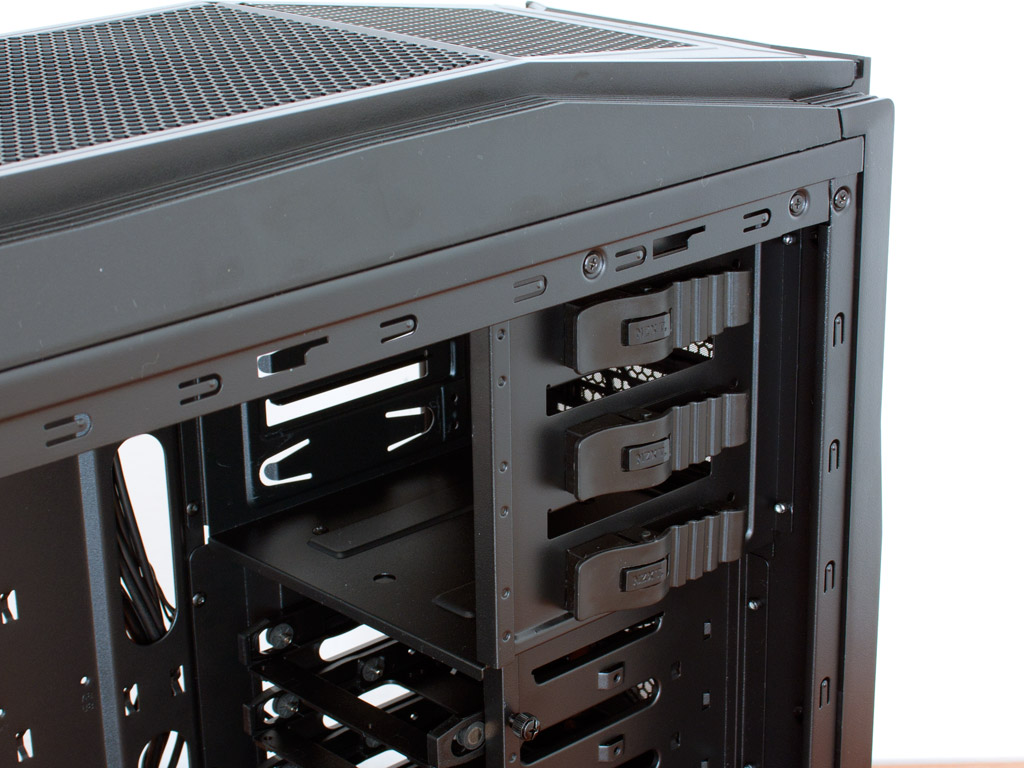
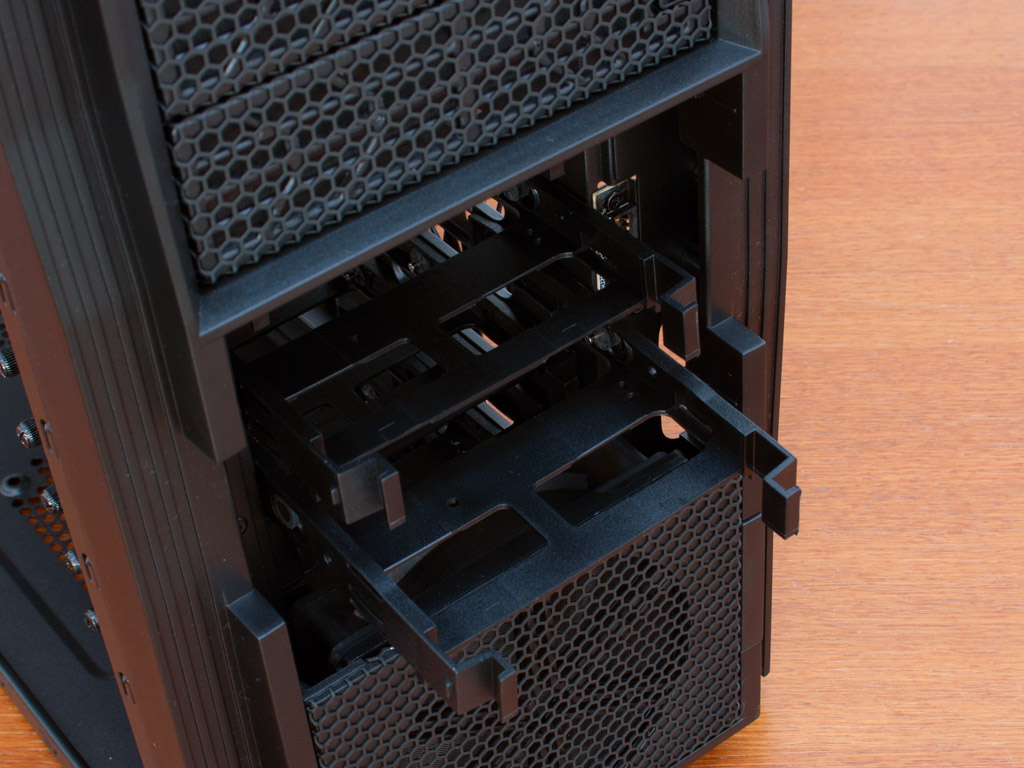
Behind these two covers are the eight hard drive bays. These can be pulled out through the front of the chassis, but due to a lack of SATA hot-swap connectors, you will still need to open the side panel up to disconnect any drives.
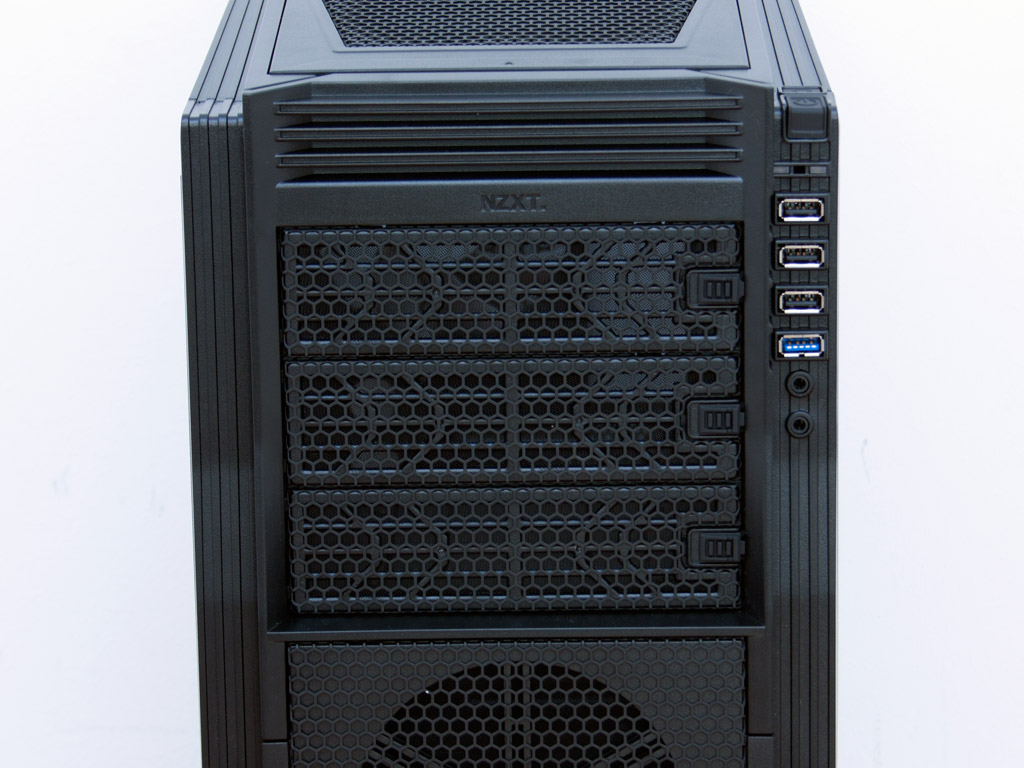

In the top are the three 5.25 inch bays. These are easily removable due to the little plastic clip holding them in place - so no pulling off the entire front panel. Next to these is the group of I/O consisting of power & reset buttons, three USB 2.0, a single USB 3.0 and the usual pair of audio connectors.


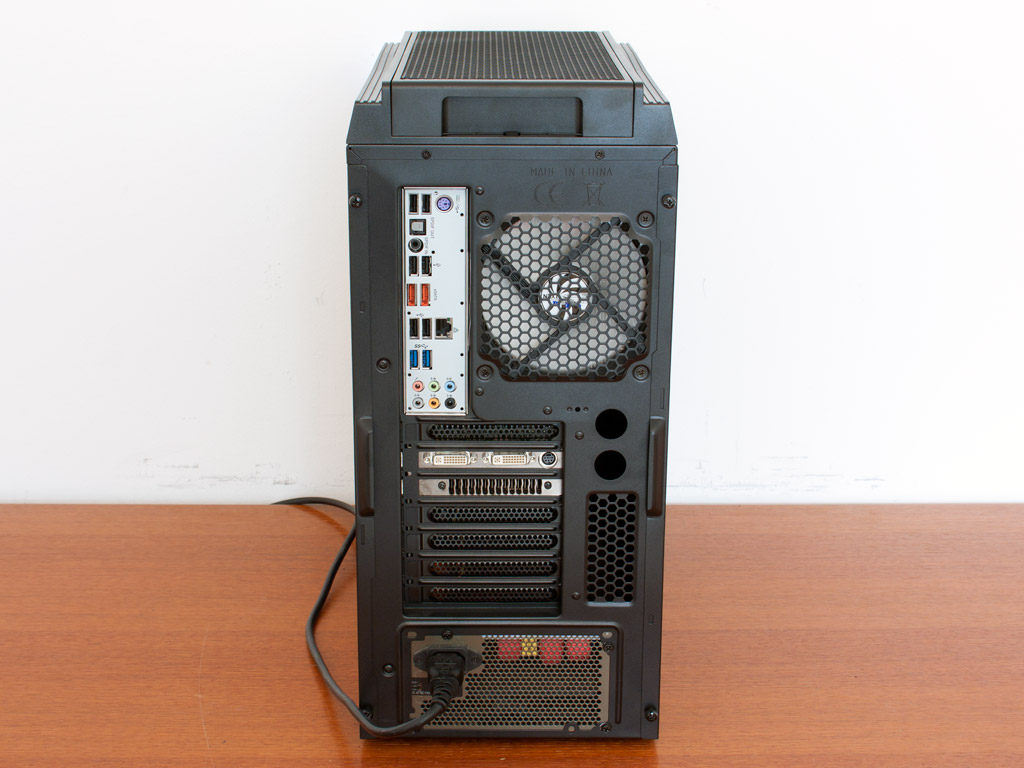
Turning the chassis over, we have the bottom PSU bay. As is the case
with most modern enclosures, you have the choice to install the power
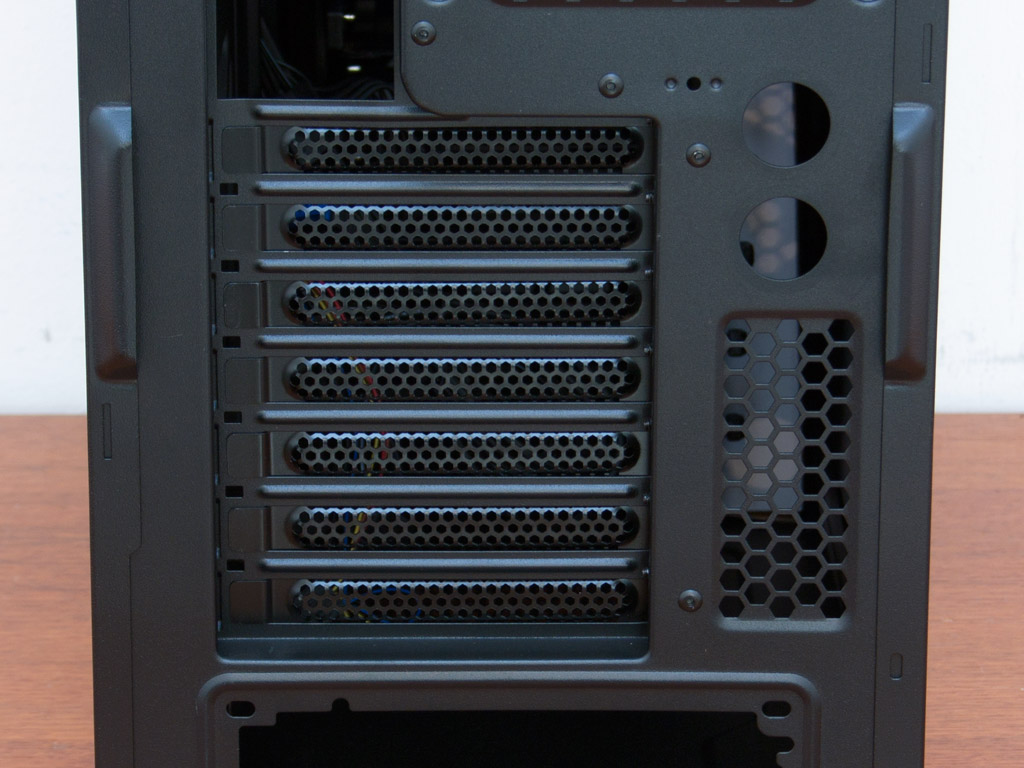
supply with the fan facing upward or downward. Above that are the seven
motherboard expansion bays and two openings for watercooling.
Interestingly enough, there are no rubber grommets in place here and
NZXT does not supply any either. In the very top you will find the 120
mm exhaust fan.


NZXT has placed a compartment in the top of the chassis. While this is
great, the plastic feels cheap and the interior quite lackluster. There
is a little divider so that you can part this storage into two separate
chambers. It would have been nice if NZXT had invested a bit more
thought into this area, for example lining the interior with a
rubberized, scratch resistant surface. In the rear of the top is a metal
mesh panel which covers the top fan spots. Due to the removable nature
of the panel and the space in this area you should have no problems
installing a radiator here or at least the fans cooling it, thus saving
you some space within the chassis.

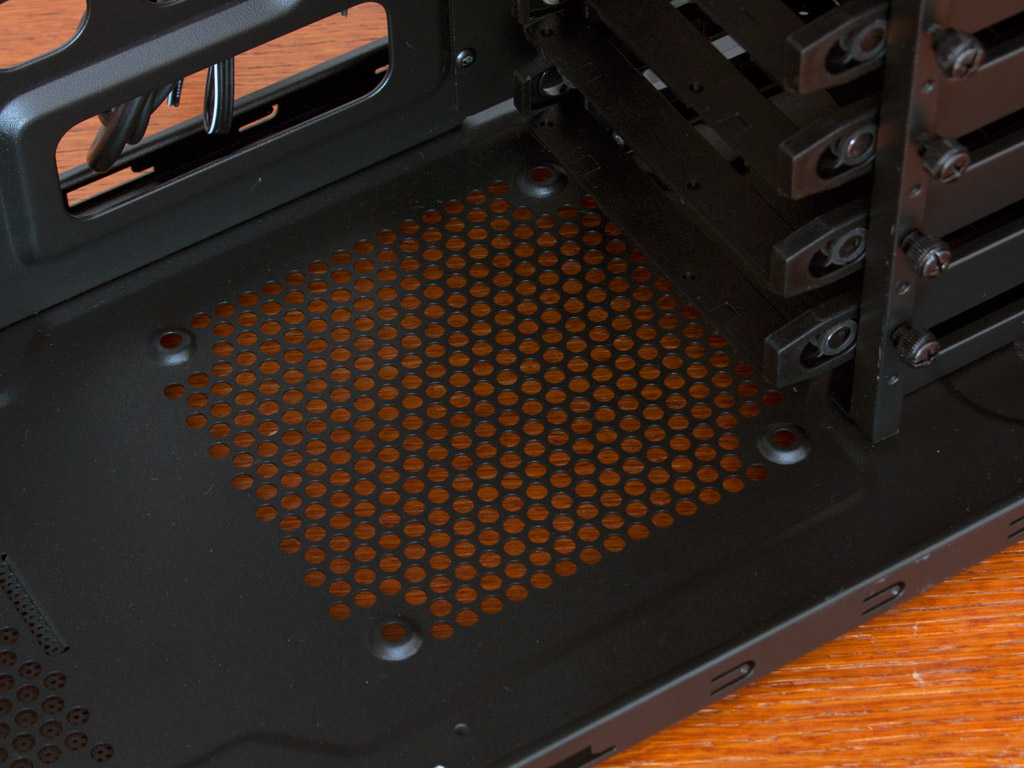
A very simple dust filter has been placed on the underside of the
chassis. It is held in place by metal cut-outs of the chassis floor and
is nothing more than a metal mesh sheet, cut down to the right size. I
would expect to see something like this in a 35 Euro chassis, but not in
one costing at least twice as much.
A Closer Look - Inside
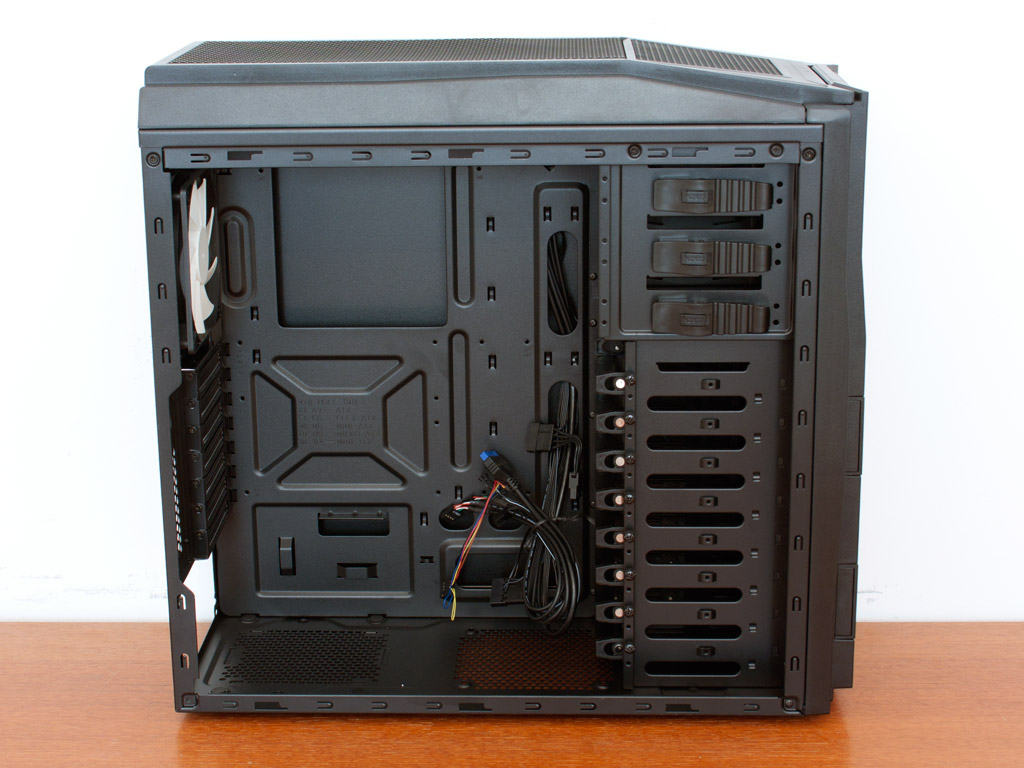


To gain access to the interior of the chassis, simply remove the pair of
thumb screws holding each side panel in place. Taking a quick look at
the insides one may think of the NZXT H2 at first. It is clear that NZXT
has taken that case as a basis for the Tempest 410. This also means,
that the chassis frame is of excellent construction quality. There are
plenty of openings around the motherboard area, allowing you to route
cables through to ensure a clean interior. With almost 30 mm of space
the Tempest 410 offers an excellent amount of space behind the mainboard
tray to hide unwanted ones.

The NZXT Tempest 410 utilizes the same hard drive tray system of the H2.
You may install up to eight hard drives into this mid-tower using the
included plastic trays. There is a line of screws in this area as well,
which is pretty cool. There are twice as many in the H2, but a single
one for each 3.5" bay should suffice. Above that are the three external
drive bays, which use the same "swing out" locking mechanism we have
seen in the Phantom, but lack the pair of thumb screws found in the H2.


Turning our focus to the rear of the chassis, the bottom PSU bay is
nothing out of the ordinary by today's standards. A few foam pads act as
an anti-vibration barrier between the PSU and chassis. Above that are
the seven mainboard expansion bays, each secured by thumb screws as
well. It is great to see that NZXT has not chosen to use cheap plastic
locks for these, so even big graphics cards can be secured without any
worries. Then there is the 120 mm fan, which - like all the other
cooling units within the Tempest 410 utilizes white blades in a black
frame. This brings the final number of fans to two within this
enclosure.

You may install an additional 120 mm unit in the floor of the chassis. I
would strongly advice against it, as there is no dust filter in here.
Users who install a unit in here may as well just shovel dust into the
chassis and save the 10 dollars for a large pepperoni pizza. In the
ceiling, the frame allows for installation of 120 or 140 mm units. You
should also be able to place a 240 mm radiator here.

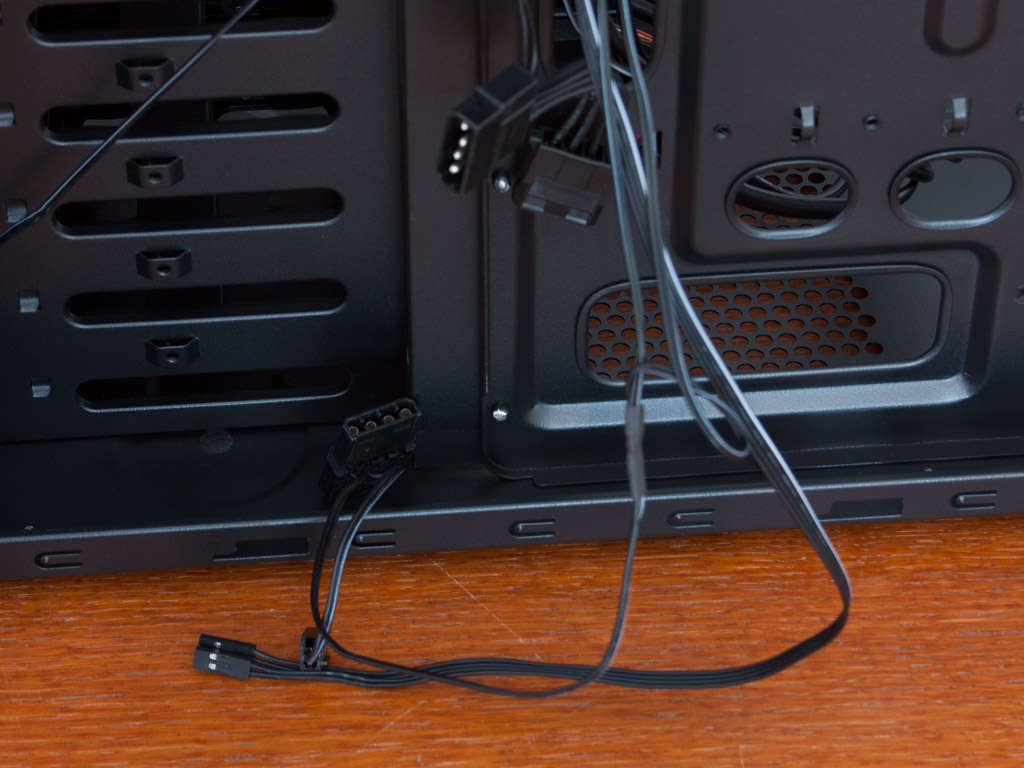
All cables within the Tempest 410 are black, which is a great little
touch. Considering that NZXT is using a 20-pin plug to connect the USB
3.0 port to the motherboard, I would have liked to see a pair of such
plugs in the front I/O instead of a single one.
Assembly

Installing the mainboard is done by the traditional use of mainboard
spacers and screws. As you can see an ATX board will fit just fine, but
things are pretty tight all around. Large graphics cards will fit, but
you will have to sacrifice a HDD bay in the process, as we have seen in
the H2. NZXT has opted not to include the rubber grommets covering the
holes of the mainboard tray, which makes things look a bit more messy.


The installation of both 3.5 and 2.5 inch drives is fairly simple. While
the former kind does not require any tools - just some muscle power,
you will have to use traditional means to secure a 2.5 inch drive to
those trays. A 3.5 inch drive is held in place by rubber lined, metal
pins, so there is no need to fear that any vibration will passed onto
the chassis frame.

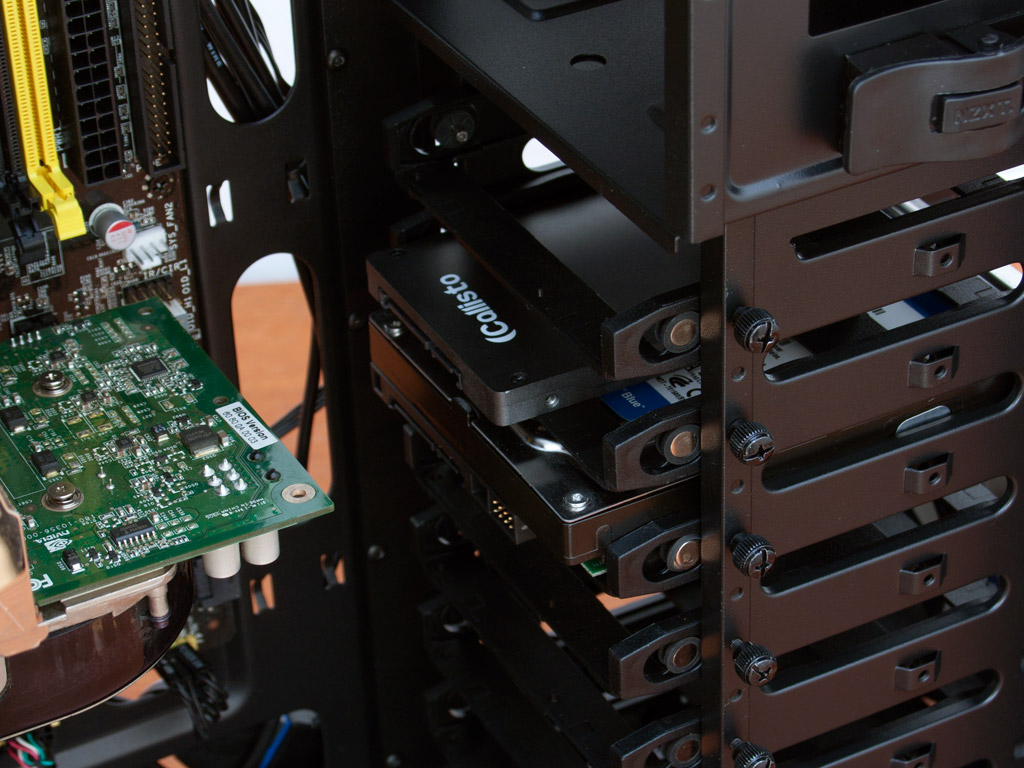
Once the drives have been placed on the trays, simply slide them into
the case through the front of the chassis. This is pretty cool and easy,
but with such a system in place, NZXT has not chosen to go the last
mile and make some or all of these bays hot swappable - a feature
already sorely missed in the H2 and also not present in the Tempest 410.


Installing the optical drives is an easy task. Simply pull out the
cover, slide the drive into place and swing the lock back so that the
pins snap into the holes of the drive. This system does hold rather
well, but still gives a tiny bit of play.


Once everything is installed, you can clearly see that cable management
is very good and keeps the mess out of the interior. Most of the cables
are routed behind the mainboard tray. Please excuse my cable mess, NZXT
supplies a few zip ties so you will be able keep this area clean as
well. Nonetheless, I was still able to put the side panel on the case
without any problems.
Finished Looks

Once everything is installed and the side panels have been placed back
on the chassis, the case makes a similar impression compared to the
empty version. The optical drive fits well within the chassis, since it
is actually the simplest part of the front looks.


NZXT has employed white LEDs for power/HDD, which looks pretty cool
actually. In the rear you can see the fan spin when turned on, while the
components can clearly be seen through the side and top opening of the
chassis.
Value & Conclusion
 |
|
|---|---|
 |
|
 |
|
The NZXT Phantom is an excellent and great looking chassis, the NZXT H2
offers a unique set of features while clocking in below that magical 100
Euro barrier and being available in black or white, the NZXT Source 210
goes for the best value with a good set of features. With all these
cases out there, the NZXT Tempest 410 seems bit lackluster. Sure you
have some of the elements of the H2 embedded into the Tempest 410,
because it uses the same frame, but NZXT has left a lot of small little
features out. These cost cutting measures tend to show when looking at
the chassis as a whole. The lack of proper, removable dust filters in
the floor, the missing rubber grommets and the superficial design
choices - especially noticeable in the top storage compartment are
oversights, which put a damper on the joy of the chassis in general.
Other companies manage to offer a similar set of features in volume -
with the advantage of something more useful in the mix, at the same
price point.
That said, the NZXT Tempest 410 is an alright chassis and delivers on all its marketing promises, but you should have a good look at what else the same price tag can get you in the crowded sub 100 Euro market as you may just find something that is of greater interest to you.