Introducing G.Skill Ripjaws Z
Just a short time ago, Intel released their latest platform, Sandy Bridge-E also known as "SB-E" in enthusiast circles. Featuring a Quad-Channel memory architecture and Intel's XMP v1.3 memory profiling, the platform also needs supporting memory, tested and approved to work properly with the Intel X79 Express chipset and Socket 2011 processors. Our first look at this new take on memory comes from G.SKILL, a well-established brand that has become one of the most globally recognized names when it comes to memory. Here's what they have to say about themselves on their website:
Our History:
"G. SKILL", established in 1989 by enthusiasts, is a leading memory module Manufacturer based in Taipei, Taiwan.
With traditional strengths, we have built an excellent reputation by meeting market demand and fostering business competitiveness both locally and internationally with our dedications to provide competitive prices, On-Time Delivery, Assured Quality, Customer-Oriented Services and Diversity of Products.
Mission Statement:
We are here to provide superior memory products, with satisfactory services in order to keep pace with our customers' growing needs, and help them by adding value to their purchases. We pledge we will continue to do so and enable both sides to obtain significant competitive advantages in the market segments.
G.Skill has released several different products for the X79 platform, all of which have been featured in our News section quite recently. The first product from G.Skill we will be taking a look at is the "Ripjaws Z" F3-17000CL9Q-16GBZH, a quad-channel kit boasting the high speed of 2133 MHz when XMP v1.3 is enabled, with 9-11-10-28 timings and requiring 1.65V.
Specifications

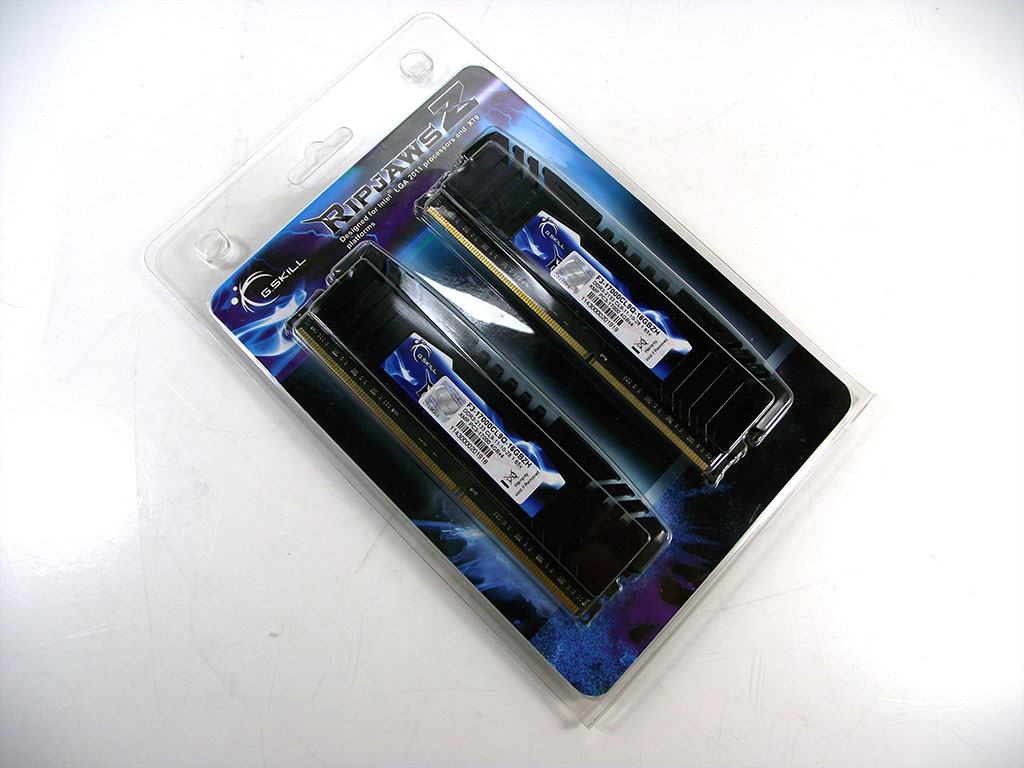
Packaging


The G.Skill "Ripjaws Z" F3-17000CL9Q-16GBZH showed up on our doorstep
direct from G.Skill's Taiwan offices, clad in plastic clamshell that
G.Skill has been using for quite some time for many of their products.
The clear plastic allows prospective buyers to see two sticks of the
memory kit itself easily, and highlights the aesthetic design of the
included heatspreaders. Up on the top right corner of the package is a
small highlight showing that this kit has been certified for
functionality on the Intel X79 platform. Flipping the package over, we
find the other two DIMMs, with a small cardboard layer in between,
isolating the pairs of sticks from each other.
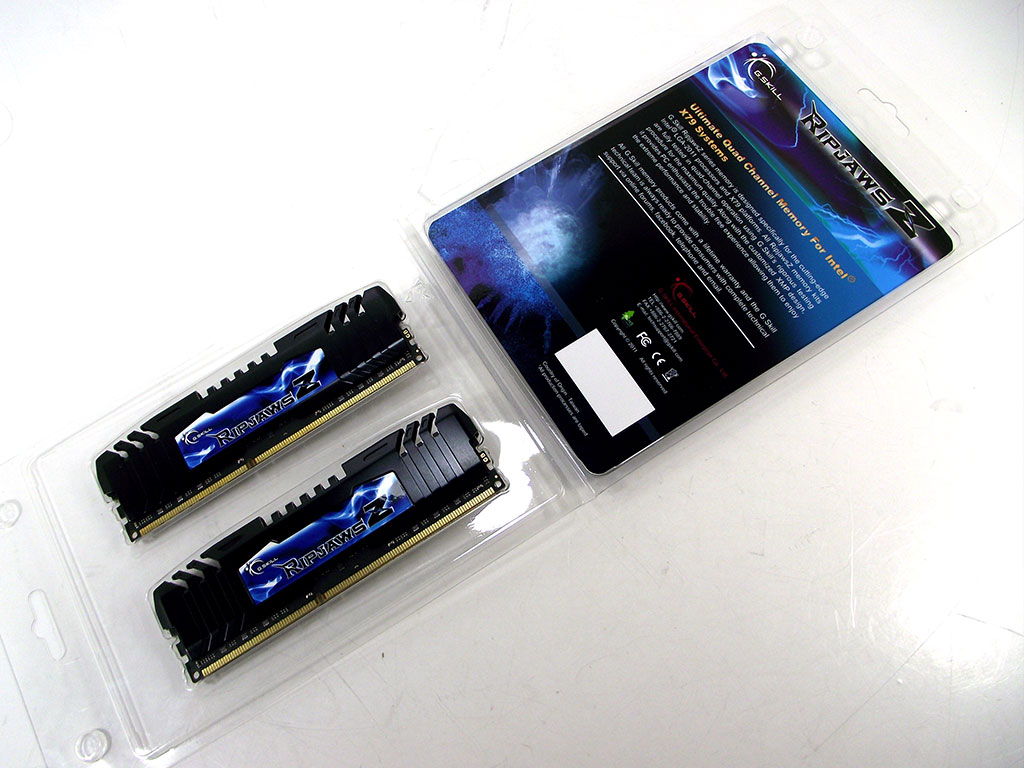

Once opened, we can see that there is a bit of information on that piece
of protective cardboard, but it seems like standard packaging info for
the product line, rather than info specific directly related to the
modules inside. The second image above shows that provided information.


With the card out of the way, we can see all four modules; each nestled
securely in its own section of the clamshell. G.Skill has informed us
that the final retail packaging may differ slightly, but as the box
isn’t exactly what we’re interested in, it’s hardly that important, but
is still worth mentioning.
A Closer Look


With all the modules out of the packaging, we can see them all clearly,
and noticed that although the appearance of each side of the DIMMs is
different at first glance; this is just due to the sticker with the
module specifications on one side. With the modules inserted into the
slot, the sticker is on the hidden side that faces the CPU socket
itself, allowing the blue and black "Ripjaws Z" logo to be seen
unobstructed.
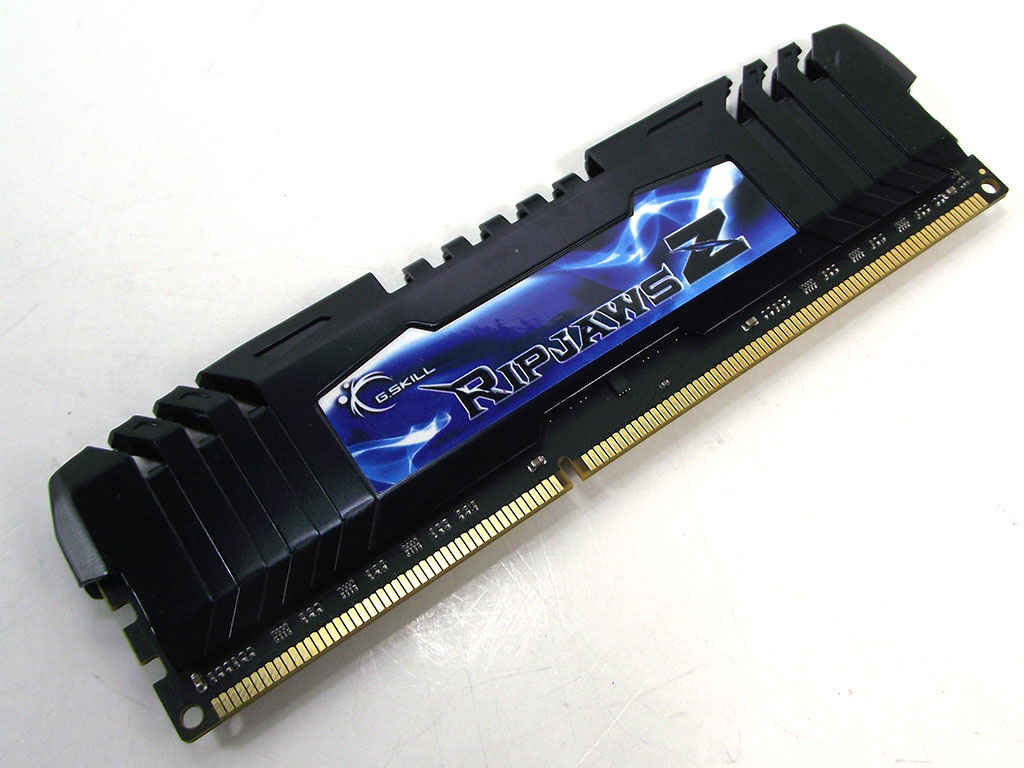

A close look at an individual module reveals that the black heatspreader
with slots in the top covers nearly the entire DIMM from end to end,
wrapping over the top and sides over the DIMM's black PCB. The fins at
the edge of each DIMM continue down the front of the module in a pattern
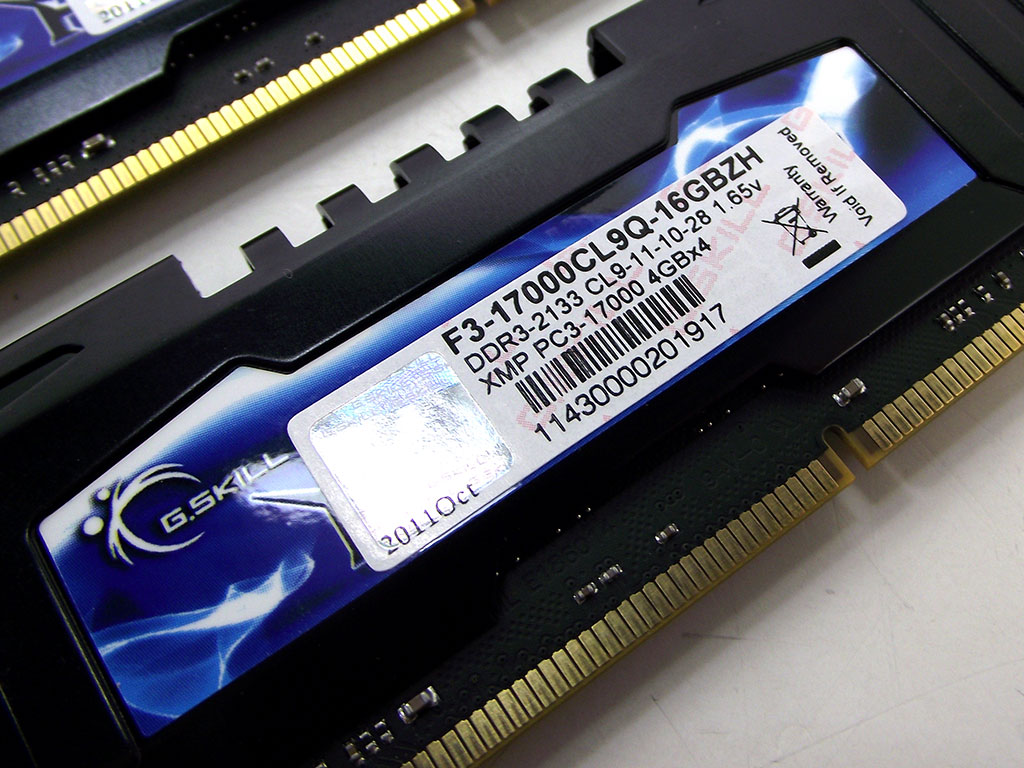
that highlights the logo. Flipping the DIMM over we can see the
specifications sticker more clearly, and that the heatspeader on this
side of the module is a perfect match for what's found on the opposite
side. Looking closely at the sticker, we can see an assembly date of
October, 2011, along with the specified timings, voltage, a line that
indicates the module is part of a 4x 4 GB kit, a UPC bar code, and at
the bottom, the module's individual serial number.


Looking up at the DIMM's connector edge, we can see that the heatspeader
dips closer to the PCB near the connector, for easy installation. From
the top, we can see the few fins used to help convective cooling, aided
by airflow around the socket. With so few cooling fins, it seems like
this module doesn't really need a lot of cooling.
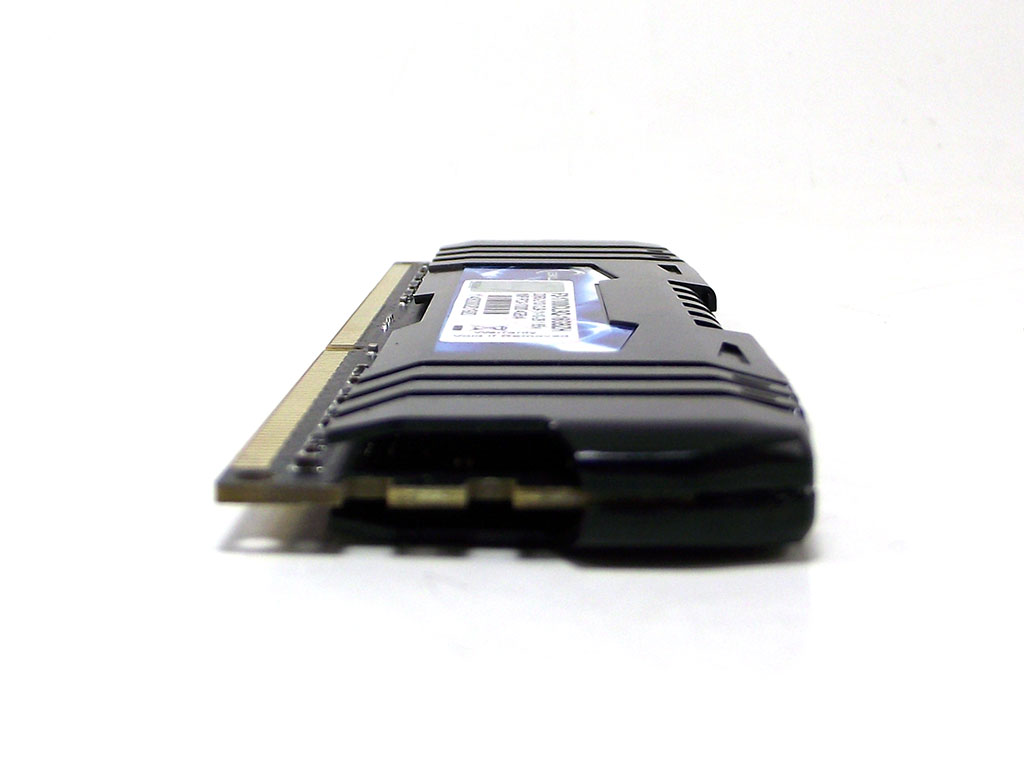

Looking at the side of the DIMM shows the rounded corners and how the
heatspreader itself covers nearly every part of the DIMM possible, with
the indentations to secure the DIMM in the slot barely peeking out from
under the heatspeader. We did attempt to have a peek under the
heatspreader to see what type of ICs are contained below, but the glue
used to attach the heatspreaders is extremely tacky, making the
heatspreaders nearly impossible to remove. Although we were unable to
remove the heatspreader, we did notice some physical characteristics
that indicate there is some form of the Hynix "BFR" ICs on our DIMMs,
made obvious by the number of solder balls each IC attaches with, as
well as the shape of the IC itself. It's widely known in extreme
overclocking circles that the Hynix "BFR" IC is quite flexible, and
offers significant headroom not seen in other 4 GB DIMMs. As always,
OEMs can change the chips mid-production, so while our sticks contain
Hynix "BFR", that is no guarantee that all kits will have Hynix ICs, nor
that they will overclock as well as our particular sample does, but
typically if you can get modules from the same batch, users can expect
similar performance. Let's take a look.
Test System

Initial Setup
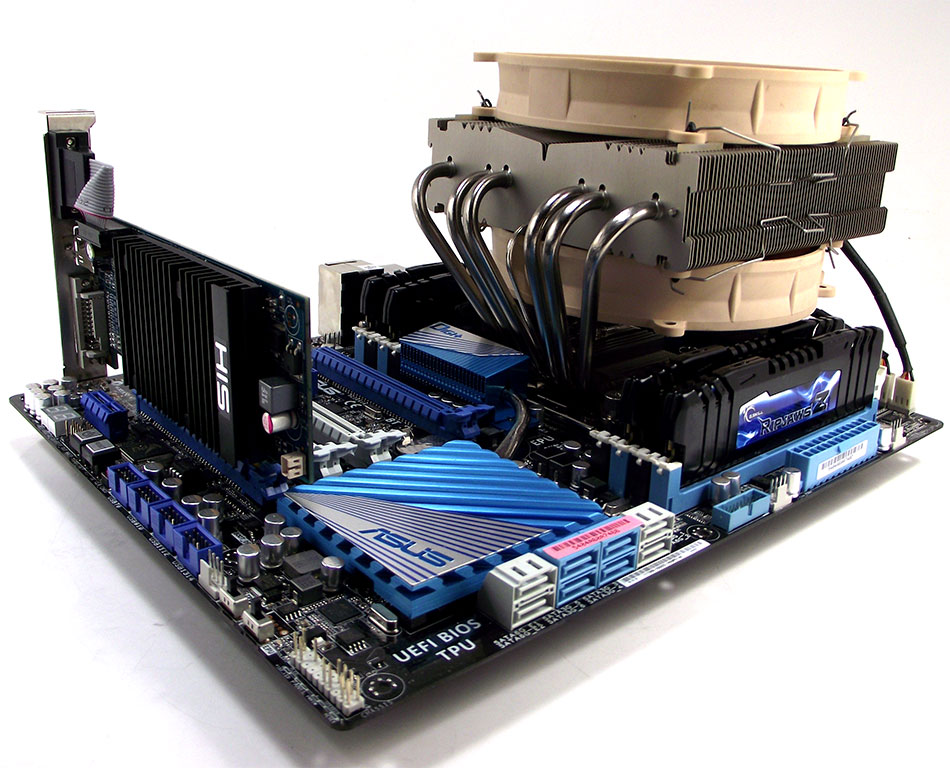
Installed into our memory test rig, shown in the first image above, the G.Skill Ripjaws Z F3-17000CL9Q-16GBZH kit matches our ASUS P9X79 Deluxe board quite nicely. Module height has been kept to a minimum allowing the modules to fit under our Noctua NH-C14 heatsink quite easily, with a small bit of room to spare, as seen in the second image above. The third image above shows the G.Skill modules installed alongside a module from another memory OEM, and highlights how the module's height can affect whether or not aftermarket coolers can be installed, or if there will be clearance issues. While the G.Skill modules fit nicely with our Noctua cooler, and sit a good distance shorter than the Mushkin module in the picture above, the Mushkin modules required that we removed the lower fan, which will affect the cooling ability of the heatsink. On the X79 Express platform, cooling is critical to overclocking, and G.Skill has done a fantastic job ensuring the greatest level of compatibility for those that like to overclock and who use custom cooling solutions.

The DIMMs themselves measure a total of 40.29 mm in height, as you can see in the image above. They are still slightly larger than a bare DDR3 DIMM, but as far as high-end memory goes, the heat speaders are quite short.
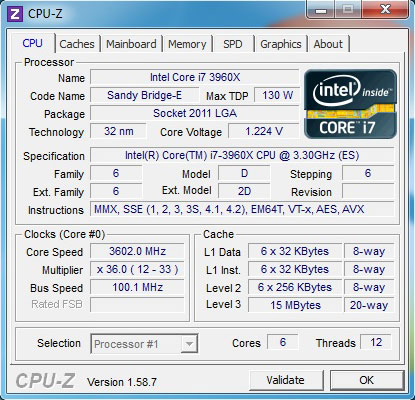


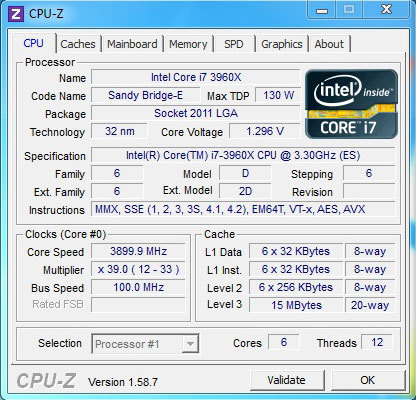
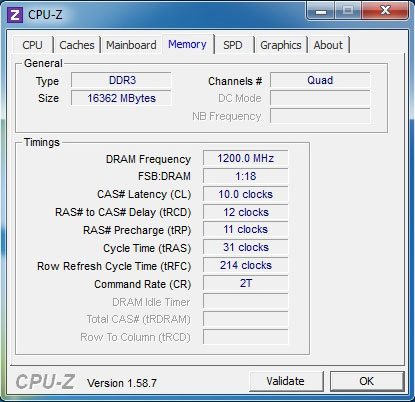
Contained within the G.Skill Ripjaws Z F3-17000CL9Q-16GBZH module's SPD ROM are two different profiles; the JEDEC 1600 MHz profile that is enabled no matter the platform the sticks are installed into, as well as the 2133 MHz XMP v1.3 profile. The above CPU-Z images show first the JEDEC profile, and then the XMP profile, as well as the matching CPU clocks. The ASUS P9X79 Deluxe board we use for memory testing applies a small automatic overclock to 3900 MHz on all cores for our Intel i7 3960X CPU, when XMP is enabled. This allows users to get the most out of their XMP-profiled memory, while at the same time helping to highlight the performance differences possible when using XMP-enabled DIMMs. It's also worth noting that ASUS and G.Skill have been working together for a long time, and nearly every memory speed offered on the ASUS P9X79 Deluxe has been tested with G.Skill modules of some type, even including the monster 64 GB/2400 MHz kits that G.Skill recently launched in the past week or so.
Performance Results

The above two images are screen captures from within the ASUS P9X79 Deluxe's BIOS. The first image shows the G.Skill module's offered profiles, including the primary as well as secondary timings that the module uses depending on which profile is enabled. This handy screen can help users manually set timings, but it's also worth mentioning that simply selecting and enabling "XMP" in the ASUS BIOS will automatically set most of these timings, but we did find that a few of the timings were different that what is reported in the screens above.
Our testing involves using only the automatic settings applied by the BIOS, as ASUS has vetted these modules in this ASUS board already, and this is how most users will run the modules. We have found over the years that very few people set secondary timings, and we always endeavor to bring results that exactly match what the end user will see on their own systems, so no manual entry of secondary timings has been made at any point, even when overclocking. ASUS has approved the modules to run in configurations varying form just two sticks, all the way to eight sticks, which would require two kits, and fill every available DIMM slot on the board.
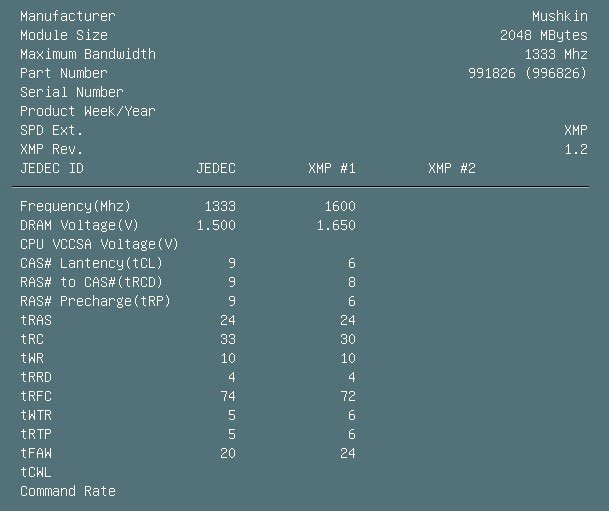
We have tested the modules both with the JEDEC profile, as well as the XMP profile, and the results are below. We have begun our comparison using the Mushkin modules we showed in the SPD screenshot above, as well as on the last page, which have also been tested with their own 1333 MHz JEDEC profile, as well as their XMP profile. The numbers below reflect performance results with four modules installed at all times.
SuperPi

SuperPi has been a standard in memory clocking in enthusiast circles for many, many years. Being highly sensitive to timing and speed adjustments both on the CPU and on the memory, SuperPi is also good for stability testing for those just benchmarking. The G.Skill Ripjaws Z F3-17000CL9Q-16GBZH wins here both with its JEDEC profile, as well with XMP enabled, even with the much higher timings in the XMP profile.
wPrime

wPrime is much more focused on CPU performance, but memory plays a role too, although timings are far more critical. Here, the G.Skill memory is just behind the Mushkin memory, but still remains fairly close even with the vastly different speeds and timings.
WinRAR

WinRAR makes use of both CPU and memory again, and the test results highlight how raw speed wins out overall, putting the G.SKill memory on top with both JEDEC and XMP profiles.
AIDA64 Read Performance

Memory adjustments on the X79 platform affect Read performance more than Copy and Write performance. Here the JEDEC and XMP profiles put the G.Skill kit ahead by roughly 700 MB/s in the AIDA 64 Read Performance test, even though AIDA 64's tests don't fully utilize all four channels on the Intel X79 Express platform.
AIDA64 Latency Performance

The gains in latency are pretty linear too, with the G.Skill Ripjaws Z F3-17000CL9Q-16GBZH kit winning out overall again.
SiSoft Sandra Bandwidth Performance

SiSoft Sandra's memory test suite provides a slightly different workload than the AIDA 64 tests do, so we've employed it for testing too. With all four channels used, the performance gaps become much larger overall, and the G.Skill kit still takes the top spot.
SiSoft Sandra Latency Performance

Latency Performance is SiSoft Sandra closely follow the trend seen in AIDA 64, again with the G.Skill memory on top, providing nearly 3% less latency in both JEDEC and XMP configurations.
SiSoft Sandra Cache Performance

The SiSoft Sandra Cache test works not only the memory, but also the CPU cache, highlighting how memory performance affects not just the memory itself, but also how your CPU operates. Here the G.Skill kit wins out by nearly ten GB/s, a quite significant number.
HandBrake Encoding

Handbrake encoding testing followed the results given by wPrime, showing that sometimes timings are more important, leaving the Mushkin memory with its lower timings winning in both JEDEC and XMP configurations.
CineBench Encoding

Cinebench encoding, on the other hand, provides a much different encoding workload, where it seems raw speed wins out overall. G.Skill Ripjaws Z F3-17000CL9Q-16GBZH kit is again on top, without a doubt.
PCMark 7

PCMark7 provides a bit of a daily usage comparison, testing different parts of the system in different ways. Even in daily performance testing, the G.Skill Ripjaws Z F3-17000CL9Q-16GBZH wins out, but only marginally so.
Shogun 2 CPU Bench

We fired up the Shogun 2 DirectX 9 CPU Performance Benchmark for some game workload testing. The results are quite close here, but that's partially due to our vastly underpowered HD5450. Even so, there are some differences, but it's really questionable as to which kit wins. At the same time though, there is a difference between the JEDEC and XMP profiles, so there are some gains to be had by employing XMP-certified memory on the Intel X79 Express platform.
Overclocking
Overclocking the G.Skill Ripjaws Z F3-17000CL9Q-16GBZH was very easy, 2400 MHz was reached with some simple primary timing adjustments, and no voltage changes. We were unable to get the next memory multiplier to boot, and BCLK adjustments failed to boot, or failed to net any performance gains once the 125 MHz BLCK divider was enabled. Even so, reaching a full 266 MHz for an overclock under default voltage is nothing to scoff at, and is far more headroom that we expected, considering G.Skill does have several different 2400 MHz kits too.
The G.Skill Ripjaws Z F3-17000CL9Q-16GBZH work really well with the ASUS P9X79 Deluxe board, so if you decide to purchase either this memory, or the ASUS board, you really should consider buying the two together. We cannot stress enough how well each played with each other.
Overclocked Performance Summary

SuperPi showed to be nearly a full second faster using the overclocked settings, and the same CPU speed.

wPrime got a small boost as well, but the gains are not really all that large at all.

AIDA Read Performance got a 500 MB/s boost nearly as much as the difference between the two different JEDEC profiles.

Latency improved by 1.5ns, not a lot, but certain apps will show decent gains from the lowered latency.

WinRAR also got a small boost, but like wPrime, it was very small.

Shogun 2 finally showed decent gains, and allowed the G.Skill Ripjaws Z F3-17000CL9Q-16GBZH to finally beat out the Mushkin kit.
Timing and Frequency Scaling
Part of our testing routine involves testing our memory samples using a variety of common timings and voltages, in order to judge the flexibility of the modules to match system overclocks. We test using three different voltage levels: 1.5 V, the standard JEDEC voltage, 1.65 V, for common XMP voltage scaling, and 1.75 V, for an overvoltage setting. We set the timings for the memory and measure the maximum frequency with each voltage, and then adjust the timings and test again. We employ several tests to measure the performance differences, including AIDA64's built-in memory benchmark, 3Dmark 2001, SuperPi v1.55 32M, as well as the RTS game Shogun 2, for some memory-sensitive 3D performance. We also swap out the HIS Radeon HD 5450 1GB card for a Sapphire HD 6950 2 GB card, in order to eliminate bottlenecks in performance introduced by the videocard.Clocking memory on the Intel X79 Express platform can provide some very interesting results, thanks to the introduction of higher memory frequency dividers as well as BCLK dividers, which allow for higher memory clocking than on any previous Intel platform. On Intel Socket 1155 products, BCLK scaling is very limited, with 104 MHz being the average maximum BCLK reported by users over the past 12 months since the Intel P67 Express platform launch. Intel's X79 Express platform expands upon its predecessor by adding both 125 MHz and 166 MHz BCLK dividers, which allow the bus to clock a lot higher. Effectively this divider de-couples the PCIe bus from the BCLK, allowing the ratio between BCLK and PCIe to be adjusted, providing for greater flexibility in BCLK clocking. Naturally with a 125 MHz BCLK matched with a 100 MHz PCIe clock, the BLCK can be adjusted in a wider range before pushing the PCIe bus outside of the range of stability, as rather than each MHz in BCLK adjustment moving the PCIe bus by the same increment, one MHz of BLCK adjustment now moves the PCIe bus just 0.8 MHz.
It's important to note that different devices on the PCIe bus have different clock tolerances, and therefore onboard devices that use the PCIe bus can greatly affect how far the BCLK can go. Due to the use of parts common to both SKT 1155 and SKT 2011, the 100 MHz BCLK divider on SKT 2011 doesn't really offer greater flexibility, so for greater clock scaling, we employ the 125 MHz BCLK divider whenever possible, and also adjust the CPU multiplier to try to match the same CPU speed for all tests, but as the BLCK used can vary according to the maximum stable memory frequency, so can the CPU speed. For our testing we have kept the CPU speed between 4.0 GHz and 4.1 GHz. The numbers provided are meant as a reference only.
Of course, because the PCIe bus still plays a role in the final effective BLCK speed, there are times where FSB "holes" are introduced, as our particular CPU, VGA, and board combination has an effective range of 100 MHz to 105 MHz using the 100 MHz divider, and 113 MHz to 133 MHz using the 125 MHz divider. For example, using the 1066 MHz memory divider and a 133 MHz BCLK results in a 1418 MHz effective memory speed. Dropping the BCLK down to 113 MHz with the 1333 MHz memory divider results in 1506 MHz, so there is a 86 MHz hole in the effective memory speed that just cannot be attained no matter what modules are used.


While clocking the G.Skill F3-17000CL9Q-16GBZH, we found 1.65 V to be the optimal voltage, allowing the frequency to scale all the way up to 2400 MHz. At lower latencies, like CL7, 1.75 V did provide quite linear scaling, but as the timings increased, the gains from running 1.75 V became less significant. As performance increased all the way up to 2400 MHz with CL10, we saw pretty good performance scaling even with the higher timings, which highlights the Intel X79 Express platform's preference to raw memory speed. Trying to get higher than 2400 MHz proved impossible, as one DIMM would fail no matter what approach was tried. This can be the downfall of clocking multi-DIMM kits, as the kit itself is only as strong as the weakest DIMM, so while these results serve as a guideline for what users can expect from their own F3-17000CL9Q-16GBZH kits, results may vary from kit to kit.
Value & Conclusion
 |
|
|---|---|
 |
|
 |
|
We spent well over a month playing with the G.Skill Ripjaws Z
F3-17000CL9Q-16GBZH kit. We tried all existing current platforms,
including AM3+, FM1, SKT 1155, and when it was released, the Intel X79
Express platform, it was intended for. We had no issues getting the
sticks to work on the other platforms, albeit at lowered speeds, but at
the same time, those lowered speeds were programmed into the XMP profile
with less voltage, too. Running 16 GB on other platforms is nothing to
ignore, but the G.Skill Ripjaws Z F3-17000CL9Q-16GBZH did it easily, and
when put on its intended platform, the kit overclocked pretty well too,
with very little tweaking required.
Our testing even proved to show that there are significant gains to be had using XMP-certified memory on the Intel X79 Express platform. We really have to give G.Skill kudos for making sure motherboard makers had samples too, to make sure that end users have the best and easiest experience possible. For normal users, and for those looking to hit the extreme end of performance, the G.Skill Ripjaws Z F3-17000CL9Q-16GBZH kit has a lot to offer, that many other kits cannot say as easily. And with that in mind, we can easily give the G.Skill Ripjaws Z F3-17000CL9Q-16GBZH a "Recommended" award.
source:www.techpowerup.com